How do I connect Blog2Social with my Twitter profile?
As you might have heard from the media outlets, Twitter changed its rules and regulations for the support of third-party tools, such as social media automation. In essence, Twitter has transitioned from a free service to a subscription-based model, ranging from a limited free plan to a comprehensive, volume-based paid plan. Please be aware that this situation affects all third-party tools that interact with Twitter. As a result, many tool providers have ceased their support for the integration of Twitter. We recognize the frustration this creates for both Twitter users and tool providers. To overcome these obstacles and to provide you with a better solution, we have implemented a new function that ensures you can continue to fully leverage Twitter's features for sharing your content through Blog2Social.
Table of Contents
Continue Tweeting with Blog2Social using your own Twitter API
With the new Blog2Social update 7.3.1 for Twitter you will maintain the ability to share your content on Twitter. To accomplish this, we'll guide you through the process of obtaining your unique API key for your Twitter account and inputting this key into your Blog2Social account.
An API, or Application Programming Interface, serves as a secure and safe bridge for software tools to interact and exchange data. This unique internet connection can be acquired from Twitter by requesting a specific key.
After completing these steps, you will be able to establish a unique connection from Blog2Social with your Twitter account and leverage Twitter’s new options along with your needs.
Digression: What is an API?
API stands for Application Programming Interface, and you can think of it like a waiter in a restaurant. In this scenario, you (the user) are a diner at a restaurant, Twitter is the kitchen where the food (data) is prepared, and the API is the waiter.
Just as you give your order to the waiter, and the waiter brings the food to you from the kitchen, when you use a Twitter application (like Twitter on your phone or a third-party Twitter tool like Blog2Social), the application sends your 'order' (a request for tweets, for example) via the Twitter API. The API then brings the 'food' (the requested tweets) back from Twitter's 'kitchen' (servers).
This way, the API allows different software applications to talk to each other and exchange information, without you needing to understand how Twitter's 'kitchen' works.
So when you're using your own Twitter API, you're basically having a personal waiter that directly communicates between your application (like Blog2Social) and Twitter, ensuring a smooth and customized service.
How to apply for a unique Twitter API
In this tutorial we will show you how to apply for a unique key to the official Twitter API. By implementing this key into Blog2Social you will be able to establish or re-establish the connection from Blog2Social to your Twitter account. Using the official Twitter API interface provides a reliable, secure, and feature-rich way to interact with Twitter's ecosystem.
Twitter offers three different subscription tiers for their API:
Free - provides 1.500 Tweets per month for free
Basic - provides 3.000 Tweets per month for $100 USD/month
Pro - provides 300.000 Tweets per month for $5.000 USD/month
Please follow the instructions below to get started:
On the official Twitter API page you can click on “Subscribe now”.
Following this, a new window will open where you can choose your preferred Twitter subscription tier (Free, Basic or Pro).

If you want to subscribe for free, please click on “Sign up for Free Account”.

You can now apply for an official, unique Twitter API key. As part of this process, Twitter requires you to detail your intended use for the Twitter data and API. Below, you will find three sample text descriptions that you are welcome to use or modify as needed. Please complete the sections marked with [...] as relevant to your website.
After completing your description, simply check the required boxes and click on “Submit” to proceed.

Sample 1:
Dear Twitter API Team,
I am seeking your permission to use the official Twitter API interface on my following website/blog/domain: [... please enter your domain name], which I use/manage for [ ... please provide some information on the purpose of your website].
My intention behind this request is to facilitate seamless sharing of my website's content on Twitter as well as to enhance my website's interaction with Twitter. This will in turn, create a more integrated and enriching user experience. I assure you that my usage of the Twitter API will strictly adhere to all terms and conditions as outlined by Twitter.
Looking forward to your positive response.Sample 2:
Hello Twitter Team,
I request your permission to use the official Twitter API interface on my following website/blog/domain: [... please enter your domain name], which has the purpose of [... please give some information on the purpose of your website].
Through the Twitter API, I aim to facilitate seamless sharing of my website's content on Twitter. Additionally, the API will be instrumental in the creation of new projects and for conducting various testing purposes.
I assure you that my usage of the Twitter API will strictly adhere to all terms and conditions as outlined by Twitter.
Thank you so much for your positive response.Sample 3:
Dear Twitter Developer Team,
I request permission to use Twitter's official API interface on my website/blog/domain:
[... please enter the URL of your website]. The objective of my website is [... please give some information on the objective of your website].
My intent in using the Twitter API is to enable me to seamlessly integrate and share my content on Twitter, thereby reaching a broader audience. It also would facilitate the creation of novel projects that could potentially add value to both my platform and Twitter's user experience. Lastly, it would provide an avenue for testing and refining these projects before their full deployment.
The integration of the Twitter API promises to significantly enhance my user engagement, offering my followers a more efficient way to interact with my content via Twitter.
Your consideration of my request is greatly appreciated. I promise to adhere to the prescribed guidelines and rules pertaining to the use of the API.
Looking forward to your positive response.
Done, you've successfully applied for using the Twitter API.
Now you can click on the little gear wheel to edit your API on Twitter.

A new window will open where you can click on “Set up” or “Edit” next to “User authentication settings”.

Please change “App permissions” to “Read and write” and the “Type of App” to “Web App, Automated App or Bot”.
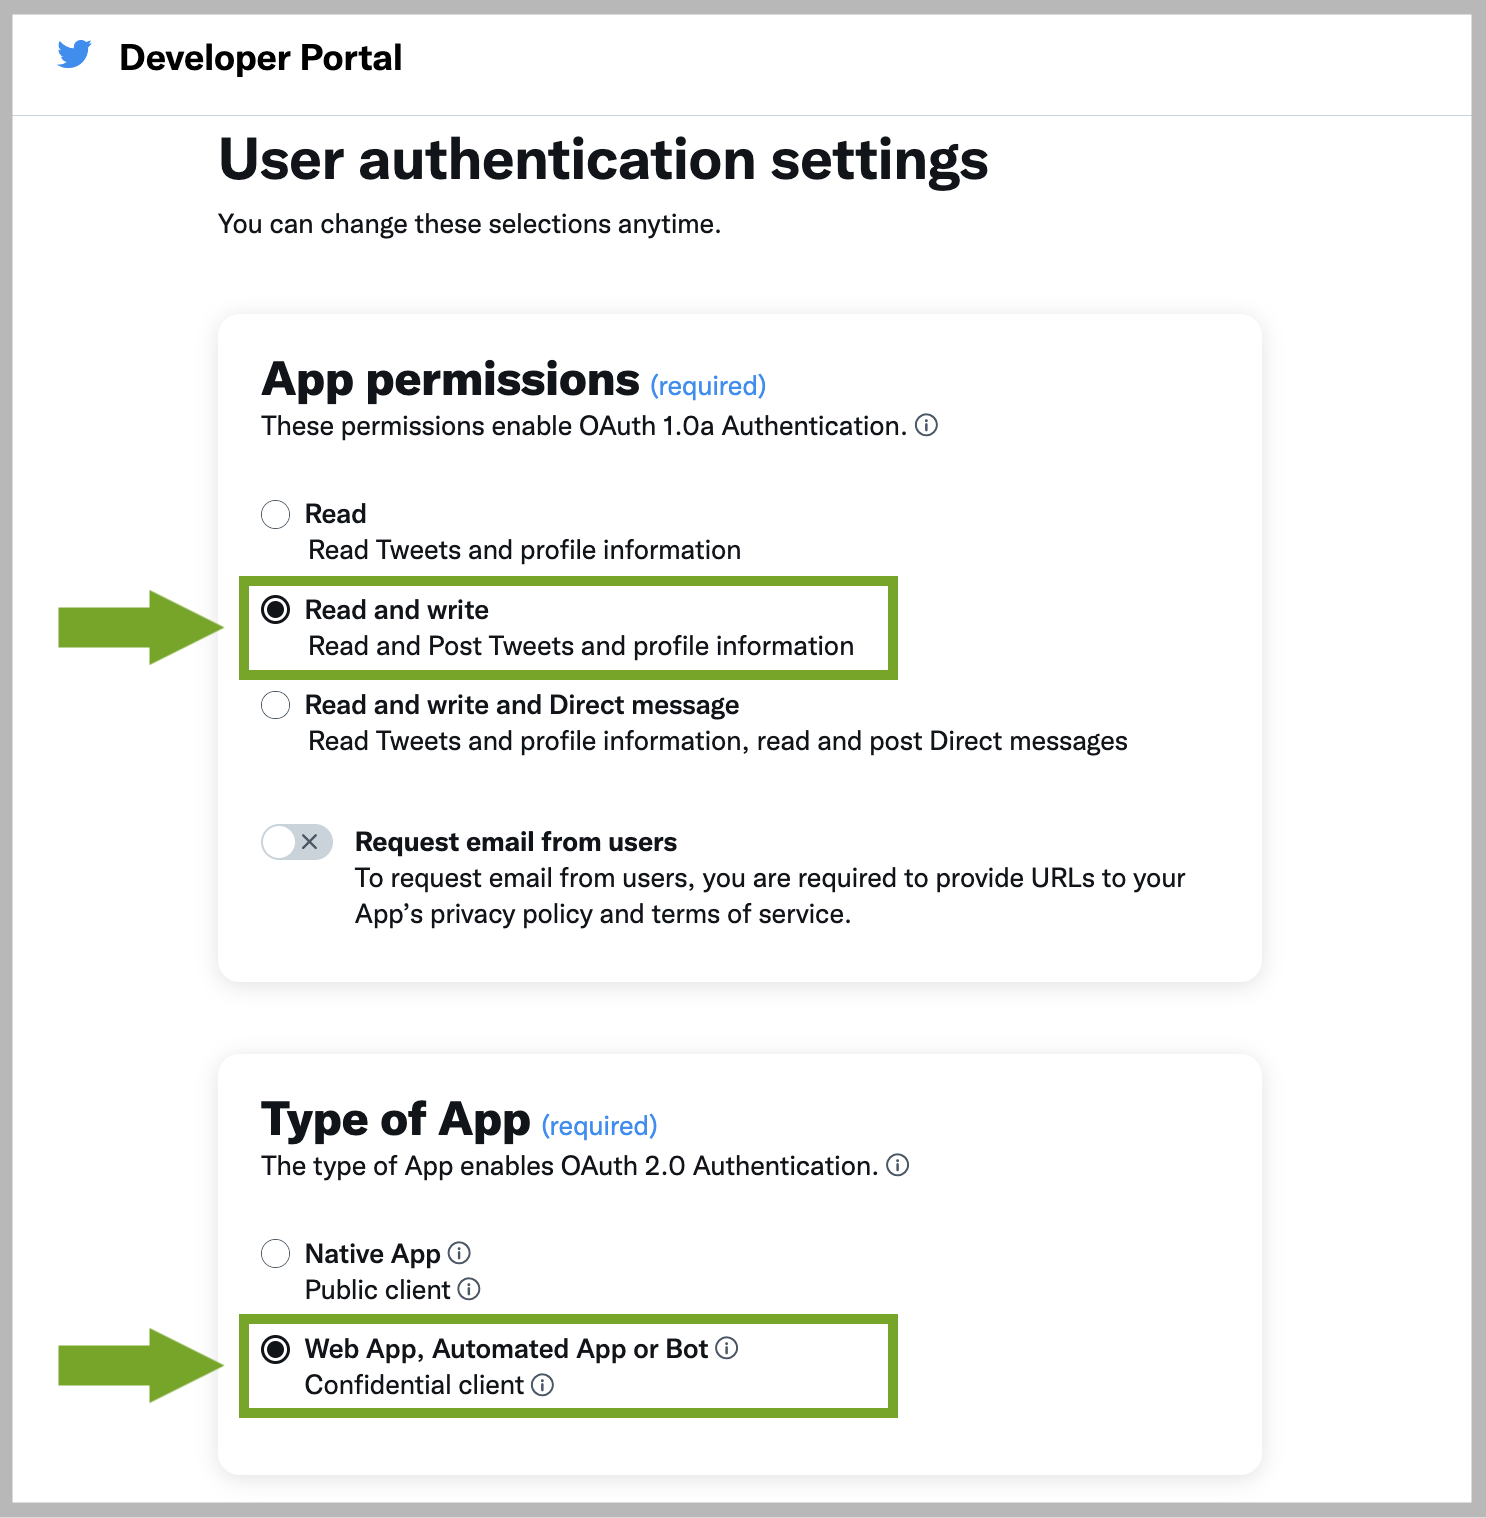
Please also add “https://api.blog2social.com/auth/v1/” as “Callback URI / Redirect URL” and enter your website in the respective field “Website URL”.

Now you can click on “Save” to save your adjustments.
After saving your settings, a new window will open, displaying your "Client ID" and "Client Secret". This is just for your information.
To get your "App Key" and "App Secret", please follow the next steps.
How to generate your API Key and Secret
Please click on the little key icon in your Twitter Developers dashboard.

A new window will open where you can generate your API key and secret by clicking on “Regenerate”. Please keep both as secure as possible and store them safely.
Please note:
If you regenerate your Twitter API Key and Secret, after already having entered this information in your Blog2Social settings, all previous Key and Secret credentials will become invalid. This will also affect all posts previously scheduled using the former API credentials. To continue sharing your Twitter posts, you will need to update this new Key and Secret information in your Blog2Social settings for Twitter in the “Networks” section and re-schedule your Twitter posts. Otherwise, your post cannot be shared on Twitter.

How to utilize your unique Twitter API Key and Secret with Blog2Social
The next step is to implement your Twitter API (key and secret) in Blog2Social and to connect your Twitter account.
If you have existing account connections to the old Twitter interface (prior to July 2023), these authorizations will no longer be valid. In this case, please delete these authorizations from your Blog2Social account and re-start the process of connecting your account.
Please click on “Networks” in your Blog2Social dashboard. After that, please click on “Manage API Apps” next to Twitter.

By clicking on “Add API App”, a new window will open where you can enter your Twitter API key and secret in the respective fields. You also can choose your own name for this app within the “App Name” field.
Please enter your data and click on “Add App” afterwards.

Great, you have successfully implemented your unique Twitter App in Blog2Social!
You can add multiple Twitter APIs and assign them to the respective Twitter accounts depending on your Blog2Social subscription:
- Free - one API app
- Smart - one API app
- Pro - three API apps
- Business - five API apps
Once you have implemented the API, it will be deposited for all WordPress users which are activated with the same license key.
Now you can click on “Connect Profile” next to Twitter in your “Networks” overview to establish the connection with your Twitter profile.

Please follow the "Troubleshooting Your Twitter API Settings" steps at the end of this guide if you're facing this notification after clicking on "Connect Profile":
"Unauthorized app. Incorrect app data has been entered. Please check your app settings and try again."

You will then be asked again to click on "Authorize app" to give Blog2Social permission to post on Twitter.

Done! You've successfully authorized your Twitter profile. Blog2Social automatically establishes the connection to your Twitter profile.
Note: If you are already connected to a Twitter profile in another tab in your browser, Blog2Social automatically authorizes the connection to this Twitter profile. Just click on "Connect Profile" in the network preview of Twitter and Blog2Social connects directly to your Twitter profile.
If you want to connect to several Twitter profiles, make sure you are not logged in on Twitter in your browser. Please log out of your Twitter profile, before connecting another Twitter profile with Blog2Social.

Troubleshooting your Twitter API Settings
Should you receive the error message: “unauthorized app”, when clicking on "Connect Profile", please check the following most common sources of error.
First of all: Please make sure you have installed the latest update of the Blog2Social plugin.
1) App permissions and Type of App
Please check the “User authentication settings” in your Twitter developer account, if the App permissions are set to "Read and write" and if the Type of App is switched to “Web App”

2) Callback URI / Redirect URL
Please check the "App info" settings in your Twitter developer account, if the correct links are entered as follows:
Callback URI / Redirect URL:
https://api.blog2social.com/auth/v1/
Website URL:
[YOUR Website URL]

If you are still facing issues afterwards, please regenerate your key and secret and update this information in your Blog2Social “Networks” overview as well. After that, please try again connecting your Twitter profile with Blog2Social.
3) Older Twitter API applications (v1): Please check whether you have the latest Twitter API version v2
Your Twitter API app should be displayed like this in your "Projects & Apps" section:

If you created a Twitter API app prior to the enforcement of Twitter's new terms of service, that API key is no longer valid. With the new terms of service, Twitter has upgraded the API to v2, making all older app keys (v1) obsolete. These older keys are no longer assigned to a project and can be found in the "Standalone Apps" section of the developer portal under "Projects & Apps".
If your app is labeled as a "Standalone App", please adhere to the following instructions to transition your API app to v2 or delete your old API app and create a new one as described above:
https://developer.twitter.com/en/docs/projects/overview
4) Auto-Poster is not triggered
If you have set up the auto-poster before refreshing your Twitter connection via the official Twitter API app, please please follow these steps:
1. Deactivate the auto-poster.
2. Click on save.
3. Activate the auto-poster and set it up with your new Twitter connection.
4. Click on save.
After that, please try sharing a new WordPress post via auto-poster which has not been scheduled beforehand.
Tags: Connect with Blog2Social, Connection, Twitter
Most popular FAQs
How to auto post imported RSS feeds
How do I auto-post and auto-schedule blog posts
Solutions: Why does Instagram not publish my post/text?
How do I connect Blog2Social with Instagram?
The connection to the server failed.
How to connect and automatically post to Facebook
I cannot connect my Facebook page
How to automatically re-publish blog posts on Bloglovin’
How to share on Facebook Profiles with Facebook