
How to integrate social media with OAuth without losing your mind — and how to turn a messy multi-network problem into a manageable developer workflow.
A familiar situation (that usually starts simple)
At some point, almost every product team hits the same idea:
“Let’s just add a ‘Post to social media’ feature.”
It sounds straightforward.
A button, a connection, maybe a few APIs.
Then OAuth shows up.
And what looked like a small publishing feature starts turning into infrastructure.
Suddenly, you are dealing with:
- redirect URLs and authorization links
- access tokens and refresh tokens
- different account types across networks
- expired or revoked permissions
- network-specific publishing edge cases
- support requests when a post fails after your API call already returned 200
This is the point where most teams realise that social media OAuth is not just authentication. It is a long-term systems problem.
What is the real problem?
Why does social media OAuth feel so complex?
OAuth itself is not the hard part. The real difficulty comes from maintaining multiple network-specific authorization flows, token lifecycles, account mappings, and publishing rules over time. The easiest way to stay sane is to treat OAuth as part of a stable publishing workflow, not as a separate feature for every network.
👉 If you haven’t decided yet whether you should build your own publishing infrastructure or use a unified publishing API, start with our guide on integrating social media posting into your application.
OAuth is conceptually simple. The user authorizes access, your application receives a token, and that token is used to perform actions like posting content or fetching analytics.
The real problem is that social media integrations do not stop there.
As soon as you support more than one platform, the complexity grows in several directions at once:
- each platform handles authorization differently
- each account can have its own token lifecycle
- users may connect multiple profiles, pages, or groups
- publishing rules vary by network and media type
- successful HTTP requests do not always mean successful publishing
That is why the long-term challenge is not “how do we do OAuth once?” but rather:
How do we keep account connection and publishing stable across multiple networks without spending all our time maintaining the integration?
The long-term challenges developers usually underestimate
1. Token lifecycle management
The first successful connection is the easy part. The real work starts later, when tokens expire, users reconnect accounts, permissions change, or a previously valid account suddenly stops working.
2. Multi-account mapping
Real products rarely deal with only one account per user. The actual model often looks more like this:
User → Network → Profile/Page/Group → Authorization → Publishing TargetThat turns OAuth into a data-model problem as much as a security problem.
3. Post-level error handling
Even if your request is accepted, the platform may still reject the content because of permissions, duplicate content, invalid media, limits, or network-side restrictions. That means developers need to evaluate the actual publishing result, not just the request status.
4. Maintenance overhead
The more networks you support, the more time your team spends maintaining integration behavior instead of building product features.
How to integrate social media with OAuth without losing your mind
The most practical approach is to stop treating OAuth as a separate engineering project for every network and instead fit it into one stable publishing workflow.
That workflow should ideally do this:
- authenticate the user for API access
- start an account connection flow
- retrieve the connected authorization
- publish content through one consistent endpoint
- inspect the actual publishing result
This is the point where a unified publishing API becomes genuinely useful. Instead of implementing network-specific OAuth and posting logic yourself, you work through one developer-friendly flow and let the API handle the network complexity behind the scenes.
What a good OAuth abstraction layer should provide
Before choosing any implementation approach, it helps to define what a maintainable solution should look like.
- One consistent authentication flow
- A unified way to connect accounts
- Centralized token management
- A stable publishing interface
- Consistent error handling across networks
- A way to retrieve publishing results and post URLs
Whether you build this internally or use an existing API layer, these are the capabilities that reduce long-term maintenance costs and keep integrations manageable as your product grows.
👉 Once your OAuth workflow is working, the next challenge is scaling it across multiple networks, teams, and publishing workflows. We cover that architectural perspective in our guide to building scalable multi-network social media integrations.
Connect social accounts through one stable API flow instead of building separate logic for every network.
Get a user access token for API requests.
Retrieve available networks and choose the correct publishing network.
Generate an authorization link for the selected social network.
The user follows the link and connects the selected social account.
Store the returned authorization ID for the connected publishing target.
Send content to the connected account and inspect the publishing result.
/user/auth → /network/list → /network/add → user authorization → /user/auth/list → /network/post/createservice_token identifies your service, access_token identifies the user session, client_user_network_id is the key value you need for publishing, and you should always inspect the returned publishing result instead of relying on the HTTP status alone.When Building OAuth Yourself Makes Sense
Using a unified API is not always the right choice.
Building and maintaining your own OAuth infrastructure can make sense when:
- Social publishing is your core product
- You need deep network-specific functionality
- You have dedicated engineering resources for ongoing maintenance
- You require complete control over authentication and data flows
For many SaaS products, however, social publishing is a supporting feature rather than the main product. In those cases, reducing maintenance overhead is often more valuable than owning the entire integration stack.
A practical implementation path with the Blog2Social API
This is where the Blog2Social API becomes relevant in a very practical way. It already provides the main building blocks developers need for this workflow: user authentication, network connection, authorization listing, posting, result handling, insights, and video workflows via the versioned base endpoint https://api.blog2social.com/rest/v1.0.
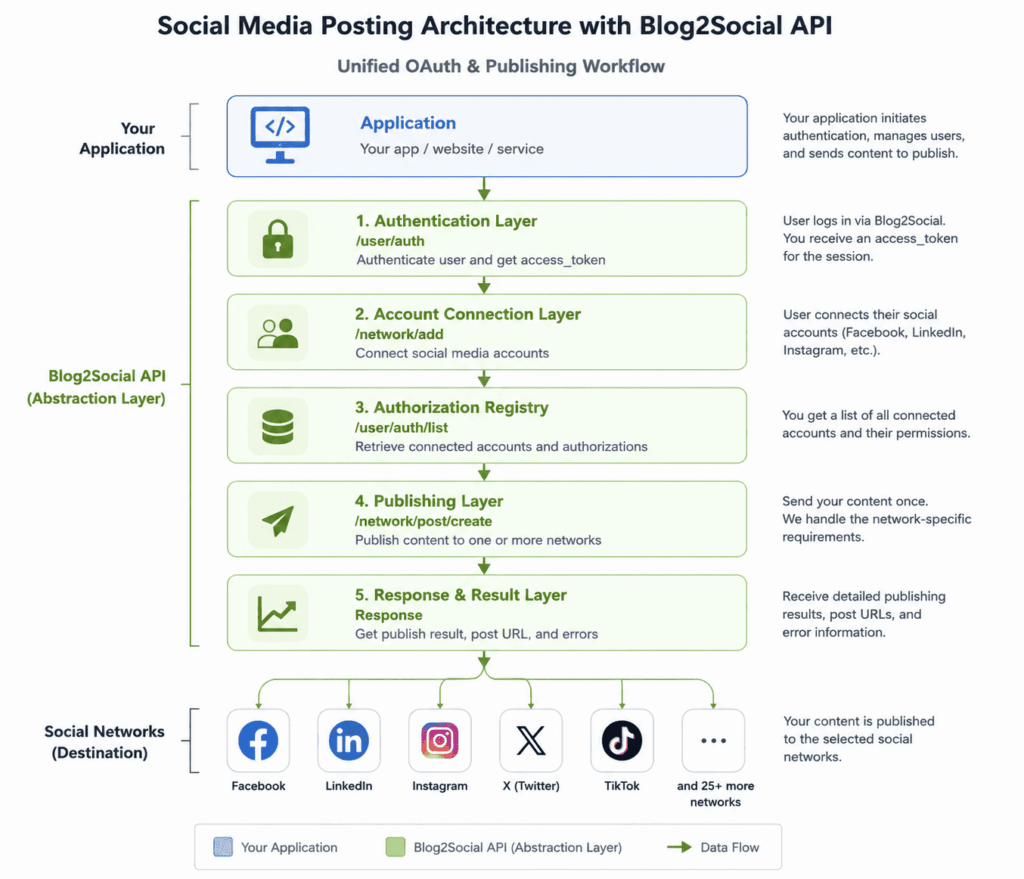
Instead of re-implementing separate OAuth flows for every platform, you can work through this model:
service_token → /user/auth → access_token → /network/list → /network/add → user authorizes account → /user/auth/list → /network/post/createStep 1: Authenticate the user
The first step is to request a user access token. The current API provides /user/auth for this and returns access_token, refresh_token, and expired_in.
curl -i \
-H "Accept: application/json" \
-H "Content-Type: application/json" \
-X POST -d '{"service_token":"YOUR_SERVICE_TOKEN"}' \
https://api.blog2social.com/rest/v1.0/user/auth/
Response:
{
  "access_token": "USER_ACCESS_TOKEN",
  "refresh_token": "REFRESH_TOKEN",
  "expired_in": "123456789"
}
This gives your application the user-level token required for the next steps.
Step 2: Start the account connection flow
To let the user connect a social account, use /network/add. This endpoint returns an authorization link and session token for the selected network and account type.
curl -i \
-H "Accept: application/json" \
-H "Content-Type: application/json" \
-X POST -d '{"service_token":"YOUR_SERVICE_TOKEN","access_token":"USER_ACCESS_TOKEN","network_id":1,"network_type_id":0,"language":"en"}' \
https://api.blog2social.com/rest/v1.0/network/add/
Response:
{
  "auth_link": "https://api.blog2social.com/auth/v1/?b2s_session_token=abc123defg456hij789klm",
  "session_token": "abc123defg456hij789klm",
  "expired_in": "123456789"
}
Now redirect the user to auth_link so the selected account can be connected.
Step 3: Retrieve connected accounts
After authorization, call /user/auth/list to retrieve the connected accounts and their authorization IDs. The most important value here is client_user_network_id, because it is required for publishing later.
curl -i \
-H "Accept: application/json" \
-H "Content-Type: application/json" \
-X POST -d '{"service_token":"YOUR_SERVICE_TOKEN","access_token":"USER_ACCESS_TOKEN"}' \
https://api.blog2social.com/rest/v1.0/user/auth/list/
Example response:
[
  {
    "client_user_id": 1,
    "client_user_network_id": 3241,
    "network_id": 2,
    "type": "profile",
    "display_name": "My Account",
    "name": "Twitter"
  }
]
This is the practical publishing target you should store in your system.
Step 4: Publish content
The main publishing endpoint is /network/post/create. It accepts the authorization ID, the user token, and a b2s_posts array with post content. The post object supports links, text, images, tags, post formats, and more.
The following examples show the same publishing request in cURL, JavaScript, PHP, and Python.
curl -i \
-H "Accept: application/json" \
-H "Content-Type: application/json" \
-X POST -d '{
  "service_token":"YOUR_SERVICE_TOKEN",
  "access_token":"USER_ACCESS_TOKEN",
  "client_user_network_id":123456,
  "b2s_posts":[
    {
      "title":"New Product Update",
      "message":"We just released a new update. Here is what changed 👇",
      "postFormat":0,
      "customUrl":"https://yourdomain.com/post",
      "mediaObjects":[
        {
          "type":"IMAGE",
          "url":"https://yourdomain.com/image.jpg"
        }
      ],
      "client_user_network_id":123456,
      "noCache":1,
      "post_id":1
    }
  ]
}' \
https://api.blog2social.com/rest/v1.0/network/post/create/const payload = {
service_token: "YOUR_SERVICE_TOKEN",
access_token: "USER_ACCESS_TOKEN",
client_user_network_id: 123456,
b2s_posts: [
{
title: "New Product Update",
message: "We just released a new update. Here is what changed 👇",
postFormat: 0,
customUrl: "https://yourdomain.com/post",
mediaObjects: [
{
type: "IMAGE",
url: "https://yourdomain.com/image.jpg"
}
],
client_user_network_id: 123456,
noCache: 1,
post_id: 1
}
]
};
const response = await fetch(
"https://api.blog2social.com/rest/v1.0/network/post/create/",
{
method: "POST",
headers: {
"Accept": "application/json",
"Content-Type": "application/json"
},
body: JSON.stringify(payload)
}
);
const result = await response.json();
console.log(result);<?php
$payload = [
"service_token" => "YOUR_SERVICE_TOKEN",
"access_token" => "USER_ACCESS_TOKEN",
"client_user_network_id" => 123456,
"b2s_posts" => [
[
"title" => "New Product Update",
"message" => "We just released a new update. Here is what changed 👇",
"postFormat" => 0,
"customUrl" => "https://yourdomain.com/post",
"mediaObjects" => [
[
"type" => "IMAGE",
"url" => "https://yourdomain.com/image.jpg"
]
],
"client_user_network_id" => 123456,
"noCache" => 1,
"post_id" => 1
]
]
];
$ch = curl_init("https://api.blog2social.com/rest/v1.0/network/post/create/");
curl_setopt_array($ch, [
CURLOPT_POST => true,
CURLOPT_RETURNTRANSFER => true,
CURLOPT_HTTPHEADER => [
"Accept: application/json",
"Content-Type: application/json"
],
CURLOPT_POSTFIELDS => json_encode($payload)
]);
$response = curl_exec($ch);
curl_close($ch);
$result = json_decode($response, true);
print_r($result);import requests
payload = {
"service_token": "YOUR_SERVICE_TOKEN",
"access_token": "USER_ACCESS_TOKEN",
"client_user_network_id": 123456,
"b2s_posts": [
{
"title": "New Product Update",
"message": "We just released a new update. Here is what changed 👇",
"postFormat": 0,
"customUrl": "https://yourdomain.com/post",
"mediaObjects": [
{
"type": "IMAGE",
"url": "https://yourdomain.com/image.jpg"
}
],
"client_user_network_id": 123456,
"noCache": 1,
"post_id": 1
}
]
}
response = requests.post(
"https://api.blog2social.com/rest/v1.0/network/post/create/",
headers={
"Accept": "application/json",
"Content-Type": "application/json"
},
json=payload,
timeout=30
)
result = response.json()
print(result)Example result:
[
  {
    "error": 0,
    "type": 0,
    "publish_url": "https://twitter.com/12345",
    "network_post_id": "123456789",
    "post_id": 1
  }
][
{
"error": 1,
"type": 0,
"b2s_error_code": "TOKEN",
"extra": {
"expired": 1
},
"post_id": 2
}
]Always inspect the returned result object before marking a post as successful. A successful API request does not automatically mean that every selected network published the post successfully.
This is where the real value of a unified flow becomes visible: you can build your UI and retry logic around one consistent result format instead of parsing completely different network responses yourself.
It is also important to remember that a 200 HTTP status only means the API request itself was processed. Your application should still inspect the returned result object before treating the post as successfully published.
What makes this practical for developers
OAuth becomes manageable when developers stop treating it as a network-specific authentication problem and start viewing it as part of a complete publishing workflow.
The challenge is not obtaining tokens. The challenge is maintaining account connections, permissions, publishing targets, and error handling across multiple networks over time.
Best practices when building with this flow
- store
service_tokenand user tokens securely on the backend - persist
client_user_network_idcarefully, because it is your publishing target - always inspect the returned post result, not just the HTTP status
- build your UI around reconnect, retry, and clear publishing feedback
- treat account connection and publishing as part of one system, not as isolated features
Developer checklist
OAuth and publishing workflow checklist
Use this checklist to move from account connection to successful publishing without losing track of the important implementation details.
A typical implementation timeline
| Approach | Estimated Effort |
|---|---|
| Build OAuth and publishing infrastructure yourself | Several weeks to several months depending on networks and requirements |
| Implement a unified publishing API | Often possible within days |
FAQ: OAuth and social media publishing integrations
Additional questions developers often face when turning account connection and social publishing into a stable product feature.
How should you design the user experience when an account connection fails? +
Should users connect accounts before creating content or during publishing? +
How can you prevent users from publishing to the wrong account? +
What should happen when only some networks publish successfully? +
How should you structure your database for social publishing targets? +
What should you log for debugging publishing issues? +
Explore the implementation flow in more detail
If you want to go deeper, the API documentation covers the full endpoint set for account connection, publishing, insights, video workflows, and user apps.
Explore the Blog2Social APIExplore implementation guides, SDKs, API documentation, code examples, and additional resources for building social media publishing into your application.
Developer Guides
Integrate Social Media Posting into Your App
OAuth for Social Media APIs
Scale Multi-Network Publishing Architecture
Implementation
API Documentation
Explore more resources in the Developer Center →

Melanie Tamblé is co-founder and co-CEO of Adenion GmbH. She is an experienced expert in content marketing and social media.
Adenion GmbH specializes in online services and tools for bloggers, businesses and agencies of any size to support their online marketing and content seeding tasks on the web.
Blog2Social as WordPress Plugin and WebApp enable fast and easy auto-posting, scheduling and cross-promotion of blog posts, articles, links, images, videos and documents across multiple social media sites.
Social media posts will be automatically turned into a customized format for each social platform and auto-scheduled for the best time. Social media post can be previewed and tailored with individual post formats, images or personal comments – all in one easy step.
About the author