This Blog2Social Guide will lead you step-by-step through the installation of Blog2Social and everything you need to know to get started. Moreover, this guide helps you understand all setting options and awesome features such as auto-posting, scheduling, and tailoring your social media posts. And, this guide also provides you with tips to make the most of your social media marketing for each social network.
- Getting started with Blog2Social
- Selecting the right Blog2Social license for your needs
- Connecting social networks with Blog2Social
- Sharing and customizing social media posts
- Sharing videos with Blog2Social
- Tips for Auto-posting with Blog2Social
- Tips for Scheduling and the Blog2Social Best Time Manager
- Re-sharing posts with Blog2Social
- Troubleshooting
- Reporting
- Affiliate program
- Assistini AI
- Conclusion
Blog2Social is a time-saving social media automation tool and WordPress plugin that offers an all-in-one solution for blogs and websites, social media marketers, businesses, and agencies who look for easy ways to automatically cross-promote and share blog posts on social media platforms.
Effortlessly share and schedule your content across various platforms supported by Blog2Social:
Facebook, TikTok, X (Twitter), Bluesky, Instagram, Threads, Pinterest, Google Business, LinkedIn, Xing, Bloglovin’, Tumblr, Torial, VK.com, Medium, Blogger, Flickr, Diigo, Instapaper, Ravelry, Reddit, Telegram, Discord, Mastodon, YouTube and Vimeo.
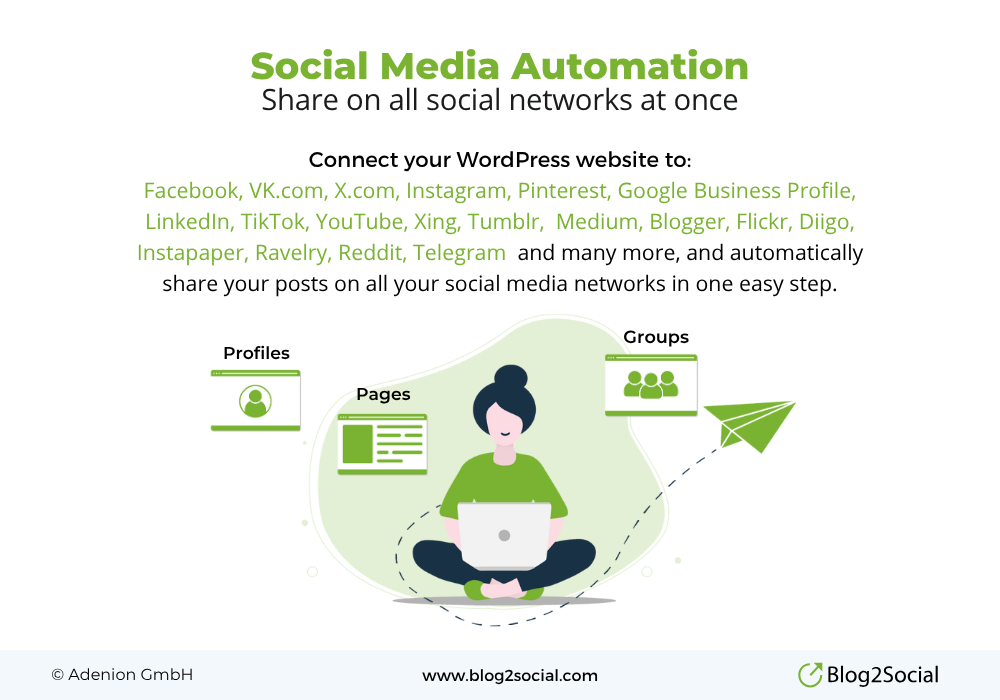
The plugin automatically turns all posts into an appropriate format for each social network.
You can auto-post or preview and edit your social media posts before automatically sharing them on all your connected and selected social media channels.
In the one-page preview editor, you can view and edit all your social media posts for each network and add individual comments, hashtags, handles, and emojis. You can share your posts instantly or schedule them for single or multiple times, or set up recurring posts. You can choose to schedule your posts at either the predefined optimal times or your preferred custom time slots.

1. Getting started with Blog2Social
Blog2Social is easy to use, requiring just a few simple steps to get started. In this section, you will discover handy links that walk you through the installation process and offer valuable insights on initiating your journey with Blog2Social.
Requirements for installing Blog2Social
The following links provide answers to any questions you may have before installing Blog2Social. You will find essential information about the specific system requirements for installing Blog2Social, the compatibility with other plugins, and security information.
System requirements for installing Blog2Social
Compatibility with other plugins
Setting up Blog2Social
Downloading and setting up Blog2Social is easy! It just takes 2 simple steps and not more than 5 minutes to share your first post. Have a look at the following links for detailed information:
How do I install Blog2Social?

Basic settings
Once you have successfully installed Blog2Social, explore the essential settings to tailor them to your specific needs. The following instructions show you how to easily switch the language of the plugin and change the password and email of your account:
I want to change the language of Blog2Social. How can I switch?
How do I change the email and password of my Blog2Social account?
2. Selecting the right Blog2Social license for your needs
Blog2Social offers a free version as well as three premium plans (Smart, Pro, and Business). Here you can find an overview of all features and supported networks.
If you’d like to give Blog2Social a try, you can test all premium features for 30 days—completely free and with no strings attached. Once your trial ends, you can choose to upgrade or simply let your account automatically revert to the free version.
Activating your Blog2Social license
Depending on the license you choose you can use your license key for multiple users on one or more WordPress websites/domains. The license key is a string of 16 characters with a combination of numbers and “-” characters.
For example: “1234-1234-1234-1234”
The following links provide you with helpful information concerning your license key, like where to find it and how to activate it.
Where do I find my license key?
How do I activate my license key?
Can I use one Blog2Social Premium license for more than one blog?
3. Connecting social networks with Blog2Social
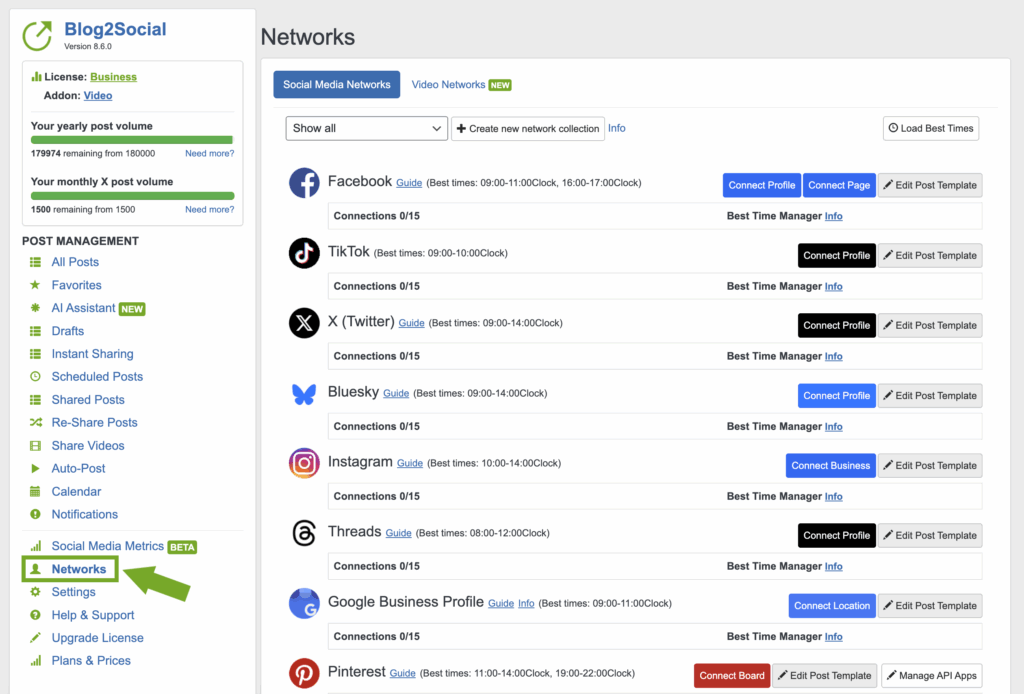
Once you have chosen your Blog2Social version you can get started with connecting social networks with Blog2Social.
Blog2Social currently supports 24 of the most popular social media. You can share your posts on profiles, on pages, and in groups (depending on the network and your license). You can also connect multiple accounts per network.
The connection process is straightforward and familiar, as it aligns with the standard procedure for most networks. Simply choose the social platform you wish to link by clicking on “Connect” in your “Networks” overview and input your credentials. It’s as simple as that.
Below you’ll find helpful information for some networks with more specific settings and how you can connect them with Blog2Social:
Checklist and solutions for connecting and posting on Facebook accounts
Checklist and solutions for connecting and posting on Instagram accounts
Checklist and solutions for connecting and posting on X / Twitter accounts
Checklist and solutions for connecting and posting on Pinterest accounts
Checklist and solutions for connecting and posting on Reddit accounts
For more information regarding other social media networks, please click here:
Questions in Connecting Social Networks
Creating and saving network selections
Blog2Social also allows you to set up selections for your preferred networks. This allows you to group specific networks for various social media campaigns. For additional information, please refer to this link:
Can I save a specific selection of Networks?
If you need help with disconnecting any of your social networks, click this link for more details:
How do I disconnect one of my social networks?
How to add more sites and users?
You can top-up your license with additional sites with an active Blog2Social Premium or Premium Business license:
- Facebook pages
- LinkedIn pages
The following link will provide you with helpful information and all steps for social media account connection top-ups:
How to add more sites and users?
You can also unlock Telegram for your Blog2Social license to connect your Telegram groups and channels. Broadcast your posts and messages automatically across your Telegram groups and channels and save time for your Telegram communication at:
Blog2Social Pricing
4. Sharing and customizing social media posts
With Blog2Social you can easily share your website posts as well as create and share any other post from any text, link, image, or video on social media. Learn everything you need to know about sharing posts on your selected social networks and how to customize your social media posts.
If you want to share one of your blog or website posts on social media, just go to the Blog2Social menu in your WordPress admin panel, click “Social Media Posts” and select the post you want to share on social media. To access the post preview click on the button “Share on Social Media”.
The post preview editor allows you to customize and share your posts instantly at all of your connected accounts or tailor your social media posts for each social network individually.

Customizing social media posts
The preview panel enables you to customize and tailor your social media posts for each social network. Additionally, with the help of AI assistant Assistini (explained in point 12 of the step-by-step guide), you can easily enhance your social media posts.
Learn how you can add individual comments, hashtags, handles, emojis and images to your posts for each network.
How do I customize my social media posts individually?
How do I insert individual hashtags in my posts?
Social Media Post Formats – The differences between Image Post and Link Post
What is the best image size for my social media posts?
How to share individual images on social media?
How to share multiple images in one post?
Customizing post templates
Post templates streamline the process of tailoring your social media posts. Modifying your default post formats will automatically transform your social media content into a distinctive layout tailored for each network and audience. These templates enable you to effortlessly customize your social media posts with a unique structure, allowing you to specify the order of variables for the title, content, excerpt, keywords, and author.
How to use post templates for social media posts?
How to use AI Templates for personalized social media posts
With the Blog2Social Business version you are also able to use custom taxonomies in your post templates with the help of individually coded functions that are interacting with Blog2Social hooks. You will find a detailed overview here:
Filters & Actions
Social Media Posts: Share text messages, links, images or videos from any sources on your social media accounts
In addition to your website content, Blog2Social empowers you to share any content from any source you want to share with your social media followers. Schedule your social media posts with any text, link, image, or video to automatically fill your social media feeds with a consistent content mix of your original WP content and any other content you wish to share.
How to create social media posts and share link, text, image or video posts
Learn how to share any link with Blog2Social
Learn more about Content Curation for Your Blog and Social Media Marketing
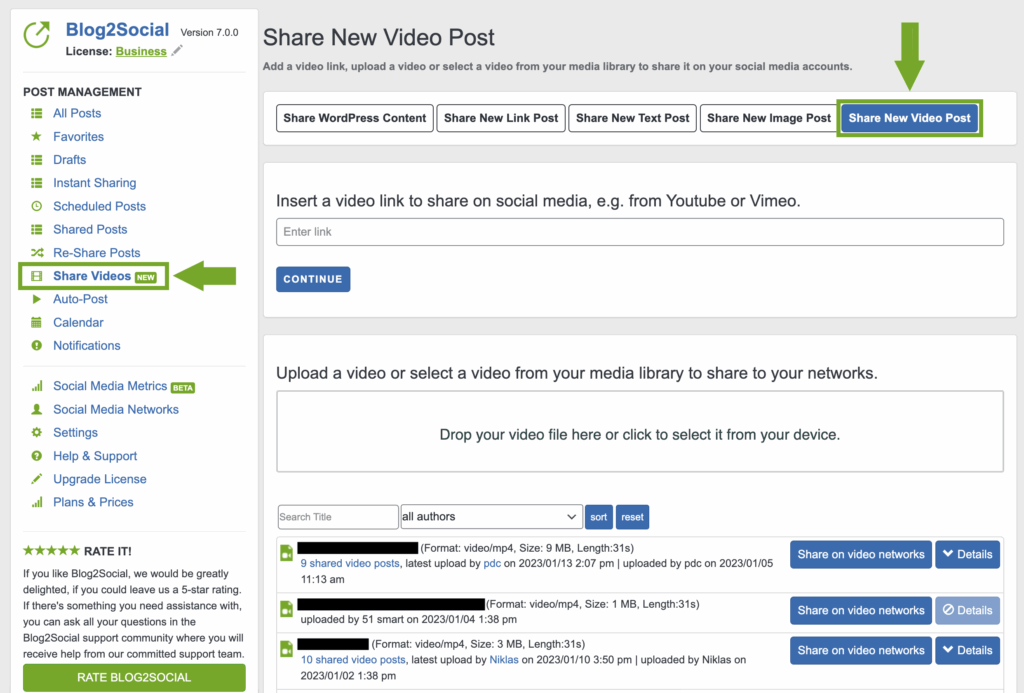
5. Sharing videos with Blog2Social
You can easily upload and publish your videos to Facebook, TikTok, X (Twitter), Instagram, Threads, Pinterest, LinkedIn, Tumblr, Flickr, YouTube, Vimeo, Discord, and Mastodon with Blog2Social.
With the new video feature, sharing your video content integrates flawlessly into your social media sharing workflow. Simply select your videos from your media library or upload videos to your WordPress media library to share them with Blog2Social.
If you upload a video file to your media gallery, add a description and a strong title to your videos and matching hashtags!
Just click on “Social Media Posts” -> ”Share Videos” or “Share New Video Post“.
How to share videos on social media?
Learn how to use AI assistant Assistini to analyze your images and videos to generate perfectly tailored texts.
6. Tips for Auto-posting with Blog2Social
Auto-posting is the fastest and easiest way to share your blog post on social media.
The Blog2Social Auto-Posting feature enables you to automatically share your post immediately whenever you publish a new WordPress post. Or, you can automatically schedule your social media posts for a specific date, with the Best Time Manager or with your personal best time settings for each network.
How do I auto-post and auto-schedule my own blog posts on social media?
In addition, you also have the option to automatically post blog posts imported via other plugins or RSS feeds to Facebook, X (Twitter), Google My Business, LinkedIn, and Telegram. The Auto-Poster for imported posts also provides you with extended filtering functions to include or exclude specific post types and categories.
How do I auto-post imported or created blog posts from other plugins on Social Media?
7. Tips for Scheduling and the Blog2Social Best Time Manager
Promoting your posts on social media and presenting them to your target audience is a powerful way to boost traffic, attract new readers, and potentially acquire customers for your website or blog. However, the reach of your post is closely tied to the level of activity within your online community at the moment you publish your post. The peak times of activity can vary among different social networks.
To maximize the lifespan and reach of your posts, it’s essential to distribute them across your social platforms on various days and at different times.
With Blog2Social you can effortlessly schedule your social media posts to align them with the best times when your community is most active. This strategic approach will not only expand your post’s reach but also boost engagement, including likes, shares, reshares, and ultimately driving increased traffic to your site.
The following blog post highlights the best times for social media posts depending on the individual social media networks available in Blog2Social.
The Best Times to Post on Social Media
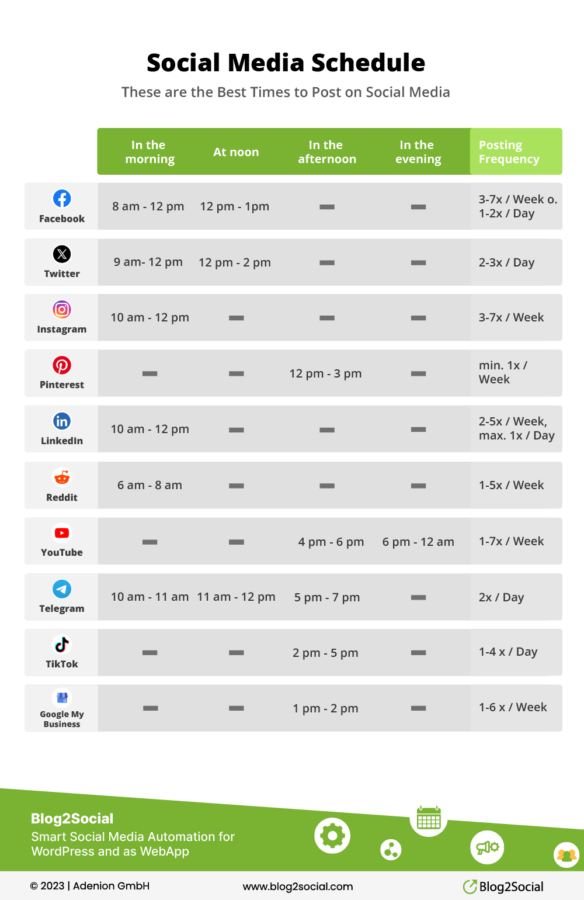
Schedule your posts at the best times to maximize engagement
By sharing your posts at the best times you can catch the time slots when followers are most active. This will increase the likelihood of grabbing their attention when you appear in your followers’ feeds. For your convenience Blog2Social provides a ready-to-use pre-configured Best Time Scheduler you can apply with a simple click. If you know which times work best for you, you can also save your own preferred times as Best Time Settings. Learn how to use the best time scheduler and how to set your times:
How do I schedule blog posts to be shared on social media in advance, using the best time scheduler?
How do I set my own time setting to post on social media?
Blog2Social -> Networks -> right-hand side of each connected social media network

How to schedule your social media post one-time, multiple times and recurrently
With Blog2Social you can either schedule a blog post to be shared once or on a recurring scheduling scheme. You can choose whether you want to repeat your content every week, every month or according to your own chosen interval. Find more information here:
How do I schedule blog posts to be shared only once?
Schedule multiple individually tailored posts
How do I publish blog posts on a recurring scheduling scheme?
How do I schedule the posting of not yet published blog posts in advance?
8. Re-sharing posts with Blog2Social
With Blog2Social you can not only share your latest WordPress posts on social media, but you can also re-share your old posts automatically. Re-sharing your evergreen content automatically helps you to revive your best content from time to time to create your perfect mix of evergreen content and new posts.
Re-share posts automatically
9. Troubleshooting
There can be various reasons why your posts could not be successfully shared on social media. In your Blog2Social account, any posts that were not successfully shared will be accessible through the “Notifications” section. To understand the reason behind a post’s failure to be shared, simply click on “Details” within the notification.

Below you’ll find helpful information for the most common issues and solutions:
Solution: Your authorization has expired. Please reconnect your account in the Blog2Social network settings.
Why is my image not displayed in my social media posts?
Troubleshooting for Instagram and Facebook page settings
How to check your blog settings with the Troubleshooting-Tool
For more information regarding other troubleshooting topics, please click here:
Questions in Troubleshooting for Error Messages
Connection to the server failed
The error “The connection to the server failed. Please try again!” is typically linked to issues on your website, such as a slow server causing a server-side timeout or overly strict security settings.
To resolve this problem, you can refer to the steps outlined in the provided link, which offers multiple solutions to address this issue.
If you have any questions regarding Blog2Social that have not been answered in this guide, please take a look at our FAQs or join the Blog2Social Support Community to provide you with more qualified help and support for technical issues and to ask all your questions about working with Blog2Social.
How can I contact the Blog2Social Customer Support?
10. Reporting
With Blog2Social you can easily keep track of your planned, scheduled, and shared social media posts.
Whenever you share a post on social media, you will get a one-page report of your current sharing scheme (shared and scheduled social media posts with links to the respective network postings).
Blog2Social offers an easy-to-use social media reporting dashboard:
- View the complete list of your blog posts with links to the one-page preview editor to share and schedule the respective post
- View the list of all scheduled social media posts, grouped by blog posts, with links to every single scheduled social media post to edit date and time and the option to delete single or all scheduled social media posts
- View the lists of already published social media posts, grouped by blog posts, with deep links to the post in the respective social network.
- Each user can see their own posts
- Administrators can see all posts
To see your shared posts on social media or to delete them, you find detailed instructions in the following links:
How do I see shared social media posts?
How to view, edit or delete scheduled social media posts
How do I re-share already shared posts?
Managing a high level of social media activity with numerous scheduled posts can indeed become challenging to track effectively. The Social Media Calendar helps you to get a better overview and easily edit and reschedule your scheduled posts per drag & drop:
How do I access the calendar feature of Blog2Social?
URL Shortener Integration
Monitor the impact of your social media marketing efforts by utilizing link tracking services such as Bitly, Rebrandly or Snip.ly.
To accomplish this with Blog2Social, activate one of these services within the Blog2Social settings and establish a connection with your Blog2Social account. By logging into your account, you can easily track your engagement and evaluate the performance of your posts across all social media networks.
How do I activate / deactivate the link-shortener?
Learn how to use Bitly links for your social media posts
How to use the URL Shortener Rebrandly for your Social Media Strategy
How to use the URL Shortener Sniply and add CTA snips to your short links
11. Affiliate program
You like Blog2Social and you want to tell other WordPress users about the plugin? Do you review and recommend tools? Then monetize your promotion with our simple and effective affiliate program! It’s free and easy to join.
With our affiliate program, you will get 15% commission on every sale you generate using your referral link. And you will receive 5% commission for each of your recurring sales. Payment of the commission is possible at any time. There is no minimum turnover.
To join the Blog2Social Affiliate Program, you can register in just a few steps. Find detailed instructions here:
How can I join the Blog2Social affiliate program?
If you are a part of our Affiliate Program, see these links to find out:
Where to find your affiliate link
Where to find advertising material for Blog2Social.
Blog2Social provides various sales triggers for converting FREE users to PREMIUM upgrades. Affiliates can benefit from these sales. You can include your affiliate id into the wp-config.php of your own blog or any blog you install and configure for your users or clients. See the following link for detailed instructions:
How can I place my affiliate ID in the plugin?
Also, find out how to get your commission in just a few steps by using the following link:
How do I get my commission?
12. Assistini AI
What is Assistini?
In short, Assistini is your new digital companion, specializing in making your social media activities more efficient, effective, and easier — as your smart AI assistant.
Assistini provides you with creative ideas in seconds and optimizes your texts to enhance the performance of your social media posts and improve interaction with your followers. Whether you’re using Blog2Social to share and schedule your content on Instagram, X (Twitter), Facebook, or LinkedIn – Assistini is your reliable creative partner.
How to work with Assistini in Blog2Social

- Create Social Media Posts
Transform existing texts or have Assistini create appealing social media posts based on a topic you provide for each of your chosen social platforms - Create SEO-optimized Texts
Increase the visibility of your social media posts, blog entries, and website texts to generate more traffic. - Generate Ideas
Provide new topic suggestions for creative social campaigns based on keywords and images. - Recognize Image and Video Content
Analyze not just your images but also entire videos to generate perfectly tailored texts. - Find Keywords
Discover relevant keywords and hashtags for your social media posts, blogs, or product descriptions to reach your target audience. - Create Ads
Create effective ads from your specifications that stand out and persuade. Ideal for generating attention, increasing interaction and expanding your reach. - Create Events
Craft exciting promotional texts for your event that spark curiosity and generate excitement to reach your audience and make your event a highlight. - Translate Texts
Overcome language barriers and reach a global audience by translating your social media posts, blog posts, and messages into one of 28 languages. - Proofread Texts
Have your texts quickly and reliably checked by Assistini’s proofreading function to always present high-quality and error-free content. - Summarize Texts
Turn your blog posts and news articles into short, crisp social media posts to create short, understandable summaries from long, complex texts.
How to Use Assistini for Creating Social Media Posts
Assistini WordPress Plugin
We’re excited to introduce a powerful new AI tool to supercharge your WordPress content workflow: Assistini – the intelligent AI writing assistant designed to help you create better content, faster.
Whether you’re a blogger, marketer, or content creator, Assistini is your new digital co-pilot for:
- Writing blog posts, product descriptions, or landing pages in seconds.
- Improving and rewriting existing content.
- Generating headlines, excerpts, and meta descriptions.
- Optimizing your content for SEO directly within WordPress.
Why Assistini?
Built for WordPress: Seamless integration with the WordPress editor.
Structured AI Writing Tools: From idea to publish-ready – guided, AI-powered writing that keeps you on track.
Customizable Templates: Use ready-made templates for common tasks or create your own to match your unique style and tone.
State-of-the-Art AI: Powered by advanced language models to ensure human-like writing.
SEO-Focused: Tools to help your content rank higher in search results.
Easy to Use: Just a few clicks and you’re ready to publish!
The perfect companion for Blog2Social users looking to streamline content creation and get more out of every post.
Try Assistini now and boost your WordPress productivity:
>> Download Assistini <<
13. Conclusion
Whether you are an agency, a business owner, social media manager or blogger, automating your social media marketing with Blog2Social will help you boost your social media exposure and gain more outreach and traffic for your website.
This step-by-step guide has led you through the basic and advanced social media marketing features of the Blog2Social WordPress solution.
Get the ultimate step-by-step guide to Blog2Social!