No matter if you manage multiple blogs, work with multiple authors, or simply have multiple Twitter accounts yourself. However, with the enforcement of the new rules, Twitter will restrict accounts in posting the same or even substantially similar original content to multiple accounts.
If you manage more than one Twitter account, it can make sense to share your content across all your accounts. In this article, we show you how to share your blog posts to multiple Twitter accounts by customizing your content in one easy step directly from your WordPress dashboard.
When sharing your content on multiple Twitter accounts, you should tailor your tweets for specific accounts or different target groups. By adding personal comments, specific #hashtags, or @handles your tweets will be more engaging and maximize your outreach. After all, it’s your objective as a blogger to reach as many people as possible while they browse by.
What are the best ways to increase engagement on Twitter? First of all, an eye-catching, engaging, and valuable tweet. Easier said than done, for sure, but there are several points that are distinctive for a well-written tweet. But even the best content and the most engaging tweet can fail due to a very specific fact of Twitter: The average lifetime of a tweet is about 18 minutes. So you have an 18 minute time window to address and reach your target group, which itself is just browsing by thrice a day in a very scarce time span. The answer to that challenge leads me right to option number 2: retweeting your content several times a day or week over a set schedule and on multiple Twitter accounts, tailored for their respective target audience and customized for every new tweet. This way, you ensure that a maximum of your followers really has the opportunity to read and engage with your content and you can further maximize your performance.
The easiest and fastest way to do so, is right from your WordPress dashboard, using the plugin Blog2Social.
Step 1: Install the Blog2Social plugin on your WordPress website
If you already work with Blog2Social, you can skip the first two steps and head right to step 3, where I talk about cross-promoting your content on multiple Twitter accounts.
For newbies, let me tell you what Blog2Social is all about. It’s a social media automation plugin for WordPress. Read how you can download, install, and use it right from your WordPress dashboard.
Once installed you can automatically share your blog posts on Twitter and other social media networks by using an intuitive dashboard. So, copying and pasting each of your posts onto several social media networks will be obsolete.
Step 2: Connect your WordPress website to multiple Twitter accounts for cross-posting
Before you start sharing your content across the social web, you have to connect your website to Twitter. If you have already installed Blog2Social you will find it in your WordPress navigation bar. Just two clicks, first on the Blog2Social icon and then on networks, will lead you to the network settings. Here you can connect your WordPress with up to 15 different Twitter accounts. Especially useful for corporate blogs or blogs with various authors. Just type in your login data and your Twitter accounts will be connected automatically.

Step 3: Cross-promote & auto-post your content on multiple Twitter accounts
If you simply want to share your post to one of your Twitter accounts you can do so by turning on the auto-poster and let Blog2Social share your post automatically, whenever you publish a new post. This is the fastest and easiest way to do so.
However, you might not want to share exactly the same message at the same time to all Twitter accounts. In accordance with the new Twitter community rules (TOS), one Twitter account can be selected as your primary Twitter account for auto-posting. Due to the Twitter rules, you should not share the same message more than once but customize your tweets individually. Blog2Social provides you with a bunch of customizing features to tailor your tweets. You can customize your message with hashtags or handles, select custom post formats, individual images for each of your tweets and schedule them at different times. The right timing can be crucial for your success on Twitter. You will get more outreach and engagement, if you are familiar with your followers preferred Twitter times. You can take a look at the best times to post on Twitter for a start. However, Blog2Social provides you with the Best Time Manager and every other option to address your followers, how, and whenever you like. I will take you through the features step by step.
3.1 How to auto-post and auto-reshare and auto-schedule content on your Twitter accounts
Once you have written a new post, you have two options to share your post on social media: “Auto-Posting” or “Custom Sharing & Scheduling”. If you want to save time, the quickest way to share your posts is simply enabling the auto-posting function on the right sidebar of your WordPress editor. Just tick the box “enable auto-posting” and choose a pre-defined selection of networks you want to post to. Or decide to post to your default selection. This way, your content will be shared immediately on every connected network, including your selected primary Twitter account, as soon as you publish your post.

Alternatively, if you want to follow a specific scheduling scheme, you can select a specific date and your pre-defined time settings and schedule your tweets in advance. If you haven’t defined any custom time settings yet, Blog2Social will schedule your tweets at best times for Twitter automatically, applying the “Best Time Manager.”
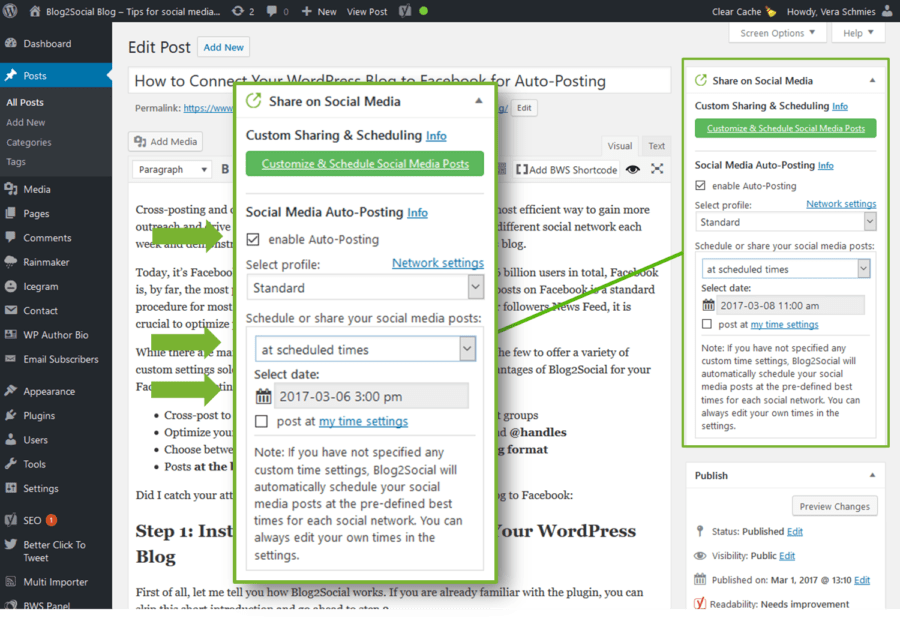
You can decide whether to send out your tweets immediately on your publishing date or to schedule your tweets for a later date. Both options are possible with just a few clicks. You can also apply the auto-poster and the auto-scheduling feature for blog posts that you have not yet published but scheduled on your WordPress blog. Depending on the social network you are posting to, the auto-poster automatically adds comments with the appropriate character count and hashtags to your posts. So your Tweet will automatically fit the 280 maximum. You can also define the message content for the pre-filled Twitter message that will be used for your post preview and for auto posting by selecting to pre-fill your Twitter message with the “title”, “title & content” or “content only”.
As Twitter is busy 24/7 you might even want to put your tweets on complete autopilot. To do so, simply activate the auto-poster by default in your Blog2Social settings and your blog content will always be tweeted immediately to your selected primary Twitter account – every time you publish a new blog post.

The FAQ: How do I auto-post and auto-schedule blog posts on social media with the Social Media Auto-Poster? provides a step by step guide for the Blog2Social Auto-poster.
Please remember: With the enforcement of the new rules, Twitter restricts posting the same or even substantially similar original content to multiple accounts. However, Re-Tweets and customized Tweets are a legitimate way to cross-promote your content on multiple Twitter accounts. The following chapter shows you how to Auto-Retweet your content with Blog2Social.
3.2 How to share Re-Tweets automatically on multiple Twitter accounts
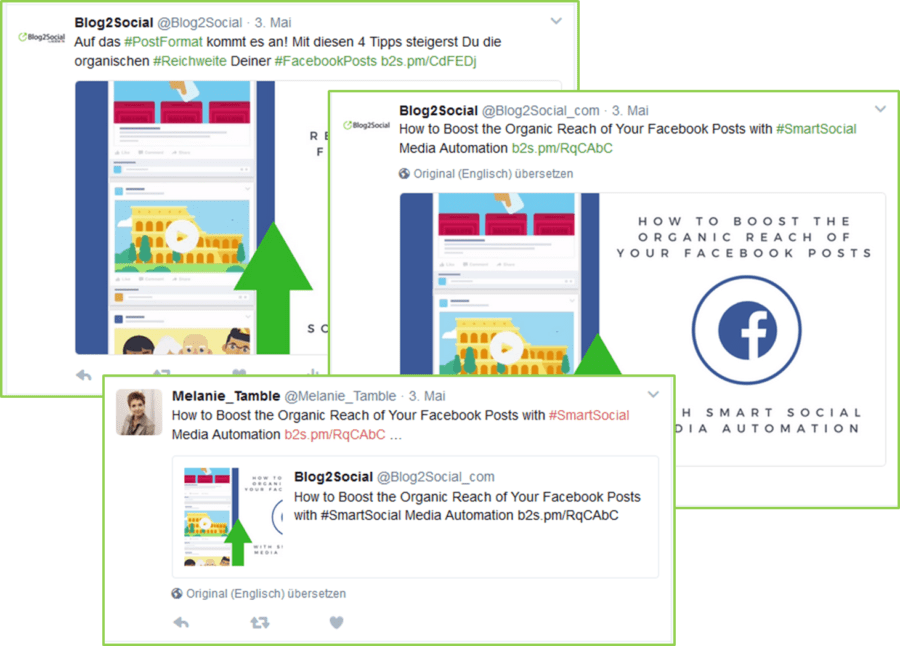
Retweets are the legitimate way to reshare the same Tweets across all your Twitter accounts in accordance with Twitter’s new rules. Learn how to schedule multiple Retweets for an original Tweet that you are planning with Blog2Social right from your WordPress.
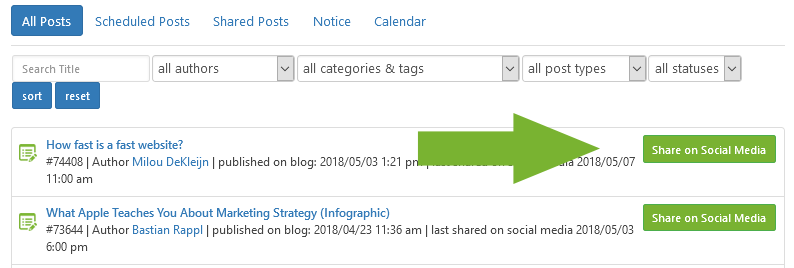
To create your original Tweet in the one-page preview editor, go to “Blog2Social -> Posts & Sharing” and select the post you want to share by clicking on “Share on Social Media”
or open your post editor and click “Customize & Schedule Social Media Posts”.

Select the Twitter account you want to share your blog post on and customize your Tweet.
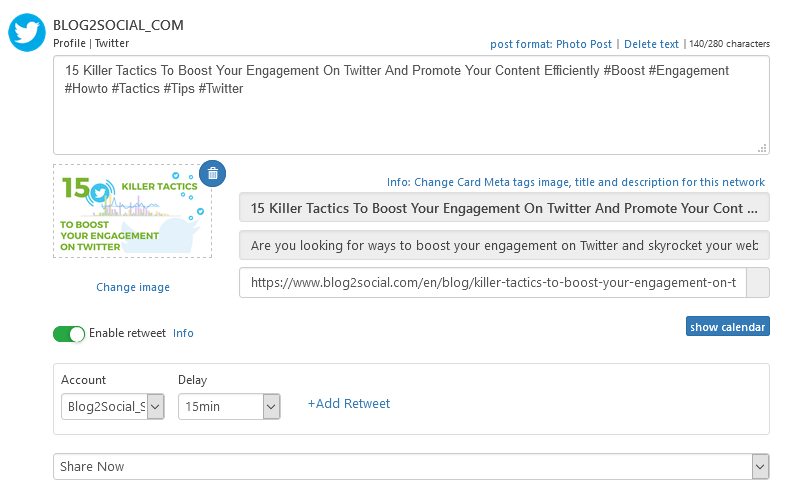
When you are happy with your post, enable the Retweet feature. Select another Twitter account to Retweet and choose a time delay for retweeting your post on this account.

You can add more Retweets by clicking “+new Retweet”.


If you have planned all your Retweets, just schedule the original Tweet as usual and let Blog2Social do the work of retweeting your Tweets for you automatically.
Please note:
Retweets have to be scheduled with a delay to the original Tweet, to make sure that the Retweet can be posted.
3.3 How to create multiple customized Tweets for your Twitter accounts
If you want to create your tweets more personal and engaging, you can also customize your tweets with individual #hashtags and @handles. The “Custom Sharing & Scheduling” option allows you to individually customize multiple tweets at a time in a one-page overview. And there are even more custom settings, in chapter 3.3 I will explain how you can customize your tweets with individual images and different posting formats for every tweet. Let’s start from the beginning to introduce you to the “Custom Sharing & Scheduling” features:

Personalized tweets with individual comments tend to trigger more engagement and can boost your visibility. By clicking on the “Customize & Schedule Social Media Posts” button in the right sidebar of your WordPress editor, you will be forwarded to the one-page preview, where you can edit all your tweets.
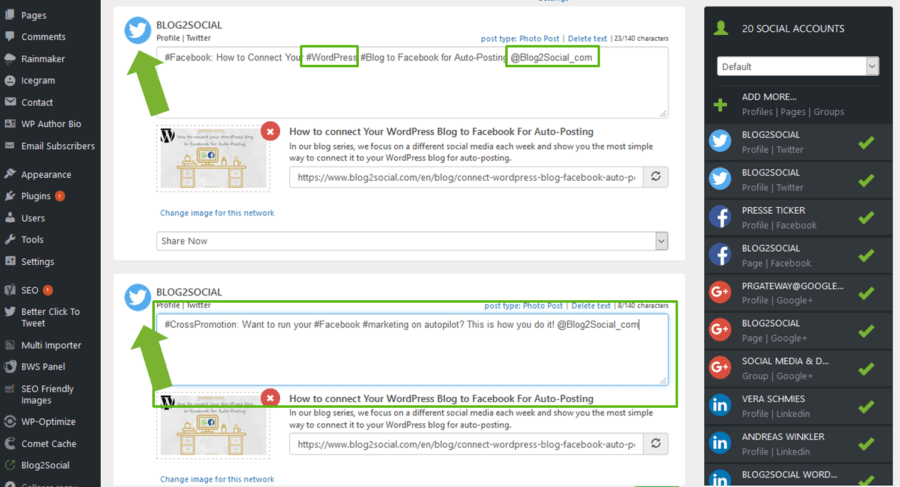
You can customize the pre-filled text and add hashtags and handles, separately for each Twitter account and each Tweet.
If you are ready to go, just click “share” and your tweet will be sent out. Apart from Twitter, you can also cross-promote your blog post to any other social network you chose in the right sidebar of your Blog2Social dashboard. All postings will be published automatically according to your individual scheduling plan.
3.4 How to set up and schedule recurring posts for Twitter
If you want to set up recurring social media posts for your blog post, you can set up various recurrent scheduling schemes for up to one year for each of your accounts. Additionally, you can decide to either publish your postings immediately or at a specific date and time or multiple times.

3.3 How to choose the right post format for link posts and image posts on Twitter
After you’ve learned how to customize your tweets, let’s take a look at the different custom post formats you can tweet. Basically, Twitter allows you to share any combination of videos, images, texts, and links, as long as you don’t exceed 280 characters. Luckily, Twitter just recently extended the character restrictions slightly. Whereas videos and images used to count as 24 characters, you can now tweet a picture without compromising space for your comment.
An image tweet with visuals, such as a photo, graphic, or infographic link to that specific image in your Twitter gallery. A link to your post will be integrated into the tweet.
A link tweet shows a preview of your post with an automatically generated image Twitter grabs from your post’s metadata, depending on the data provided by your WordPress theme. Both formats work great for driving followers to your blog post. But for some purposes, you might want to make sure to use a specific format for your post.
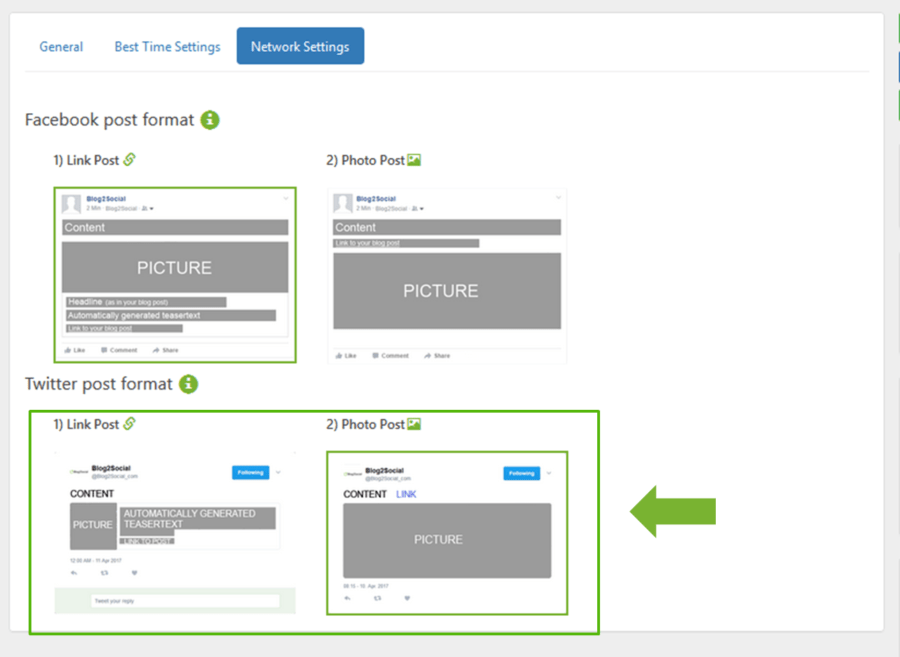
With Blog2Social you can choose to post link or image tweets. To do so, simply go to “Settings” in your Blog2Social dashboard and select the tab “Network Settings”. Here you can select whether you want your blog posts to be shared with a link preview or as an image tweet with an individual comment containing the link to your website. If you choose the image tweet option your followers can click on the images or infographics you’ve shared and view it right there in their Twitter feed. By including a short-link in your comment, users will still be able to visit your blog.
This way, you can schedule your tweets for multiple accounts in an individual post format and with individual comments. A big time-saver, especially, if you are promoting your content to an international audience and in different languages.
3.4 How to select individual Images for Twitter
When you post image tweets, this option also allows you to select an individual image for your tweet, an image from your media library or even a different image upload from your computer. With a simple click on the displayed default image, you can choose and select a different image. This way you can select individual images for every Twitter account, tweet, or scheduling plan to even give recurring tweets a different look.


If you choose the linked post, your followers will be forwarded to your WordPress blog as soon as they click on the tweet itself. In this case, twitter scrolls the metadata of the shared link and automatically inserts the featured image of your blog post into the link preview.
3.5 How to set up and schedule recurring posts for Twitter
If you want to set up recurring social media posts for your blog post, you can set up various recurrent scheduling schemes for up to one year for each of your accounts. Additionally, you can decide to either publish your postings immediately or at a specific date and time or multiple times.
You can also set up a general recurring time-scheme to auto-reshare your Tweets. The following guide will show you how to re-share your Tweets automatically with the Auto-Reshare feature.
3.6 How to track your Tweets on multiple Twitter accounts
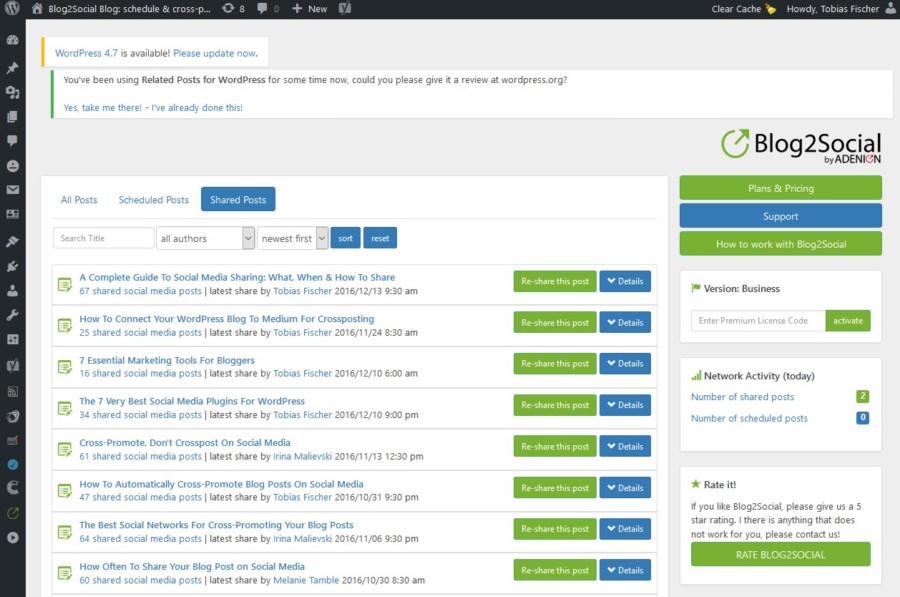
A click on “Post & Schedule” in your Blog2Social dashboard leads you to an overview of all published and scheduled social media posts. In a table or calendar view, you can see all the relevant details. When will the post be published on social media? Who scheduled the post?

This way you can also see how a specific tweet worked. With a simple click, you will be forwarded either to Twitter or any other network you’ve posted on and check likes, comments, and retweets.
4. How to automatically re-share your old posts on multiple Twitter accounts
Blog2Social enables you to republish your older posts on multiple Twitter accounts. You can either do so directly in your WordPress edit mode, by following the instruction above, or you go straight to your Blog2Social dashboard. There you go to the section “All posts” and pick the post you want to share, then click on “Re-share this post”. Now you can select the networks you wish to republish your content to. You can also schedule your posts according to the best times settings for each network and target audience.
If you want to share the same blog post more than once or re-share your evergreen content repeatedly, you can vary your posts with different comments and by selecting individual images for every tweet or scheduling unit. Use multiple tweets with variations for each comment to create more engaging tweets and to go along with the new Twitter rules.
These easy steps work for scheduling your not yet published posts, as well. With the WordPress editor, you can plan to publish your posts at a specific date and time. As soon as you have planned your post to be published at a specific date and time, you may also schedule the post for your Twitter account, as described before.
Wrap up
Social media are the most powerful sources to drive traffic to your blog. Especially Twitter allows you to easily spread your message and reach out to millions of potential readers. With multiple Twitter channels, you may also address different target groups. Blog2Social makes it easy for you to automatically share your blog post on multiple channels with customized tweets, post multiple tweets multiple times, and even schedule them for up to a year in advance. A variety of custom post formats and customizing options make your tweets more diverse, vivid, and engaging. Besides Twitter, also consider other networks provided in the plugin to put your WordPress posts in front of an engaged social media audience.
Have a look at this video to check out all networks available with Blog2Social.
After graduating from Örebro University in Sweden with a Master’s degree in Digital Journalism Vera Schmies is now responsible for online PR, content marketing and social media at Adenion GmbH.