How to connect and post to XING
The business network XING offers an ideal platform to present yourself and your company in a professional environment. You can easily build a professional network and manage business contacts.
XING offers many careers related features and topics. Besides job offers, job requests and Employer Branding much revolves around New Work topics. As a social media network, XING is also a valuable channel for successful B2B communication.
Your presence on XING is based on your personal profile. In addition, you can create company pages (employer branding profiles) that are particularly suitable for brands, products, and services.
How to connect Blog2Social with XING
On XING you can publish your content on your
- Profiles
- Pages
- Company pages (Employer branding profiles) for news about your company, brands, products and services
How to connect Blog2Social with my XING Profile
Connect your XING profile to Blog2Social to automatically post to your profile. Your posts and content will then appear in your profile under "Activities" for visitors of your profile and will also be displayed to your contacts' news streams (home page).
Click on "Networks" in the Blog2Social menu of your WordPress backend and then on "Connect Profile" next the network XING to link your XING profile to Blog2Social. The login page opens.

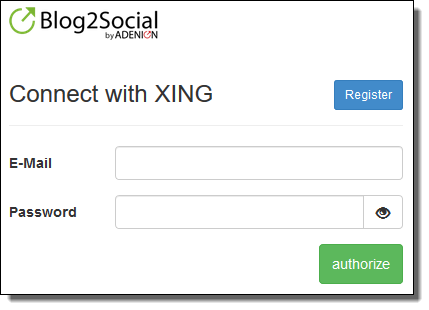
Authorize your connection to XING by entering your email address and password and clicking "authorize". Blog2Social will then automatically connect to your XING profile.
Once you have successfully connected your XING profile, it will be listed as a connection on the network page. You can now use Blog2Social to post to your XING profile and schedule your posts.
>> Learn how to publish blog posts on your XING profile
Login failed
If you are having trouble connecting to XING, please make sure that two-factor authentication is disabled in the settings of your XING account.
In rare cases, a long password with special characters may cause issues with the XING interface. Please try again with a shorter password without special characters.
How to connect Blog2Social with my XING Company Page
You can connect all XING company pages (employer profiles) that you manage as an administrator. On the XING company page, your posts automatically shared by Blog2Social appear in the "News" tab.
The News section is particularly suitable for company news, job offers, employer branding topics, but also for specialist topics or press releases.
Please note: If you use the free version of the XING company pages, there is only one administrator. Only this person can post news to the corporate pages.
Click on "Networks" in the Blog2Social menu of your WordPress backend and then on "Connect Page" next the network XING to link your XING page to Blog2Social. The login page opens.


Authorize your connection to XING here by entering your email address and password and clicking "authorize". Blog2Social will then automatically connect to your XING account and you can select the XING company page you want to connect to (if you are the site administrator and have permission to do so). Then click "Confirm".
Once you have successfully connected your XING page, it will be listed as a connection on the network page. You can now use Blog2Social to post to your XING page and schedule your posts.
>> Learn how to publish blog posts on your XING company page
Login failed
If you are having trouble connecting to XING, please make sure that two-factor authentication is disabled in the settings of your XING account.
In rare cases, a long password with special characters may cause issues with the XING interface. Please try again with a shorter password without special characters.
How to publish blog posts on XING
There are two ways to share your blog posts on your selected XING profiles and pages:
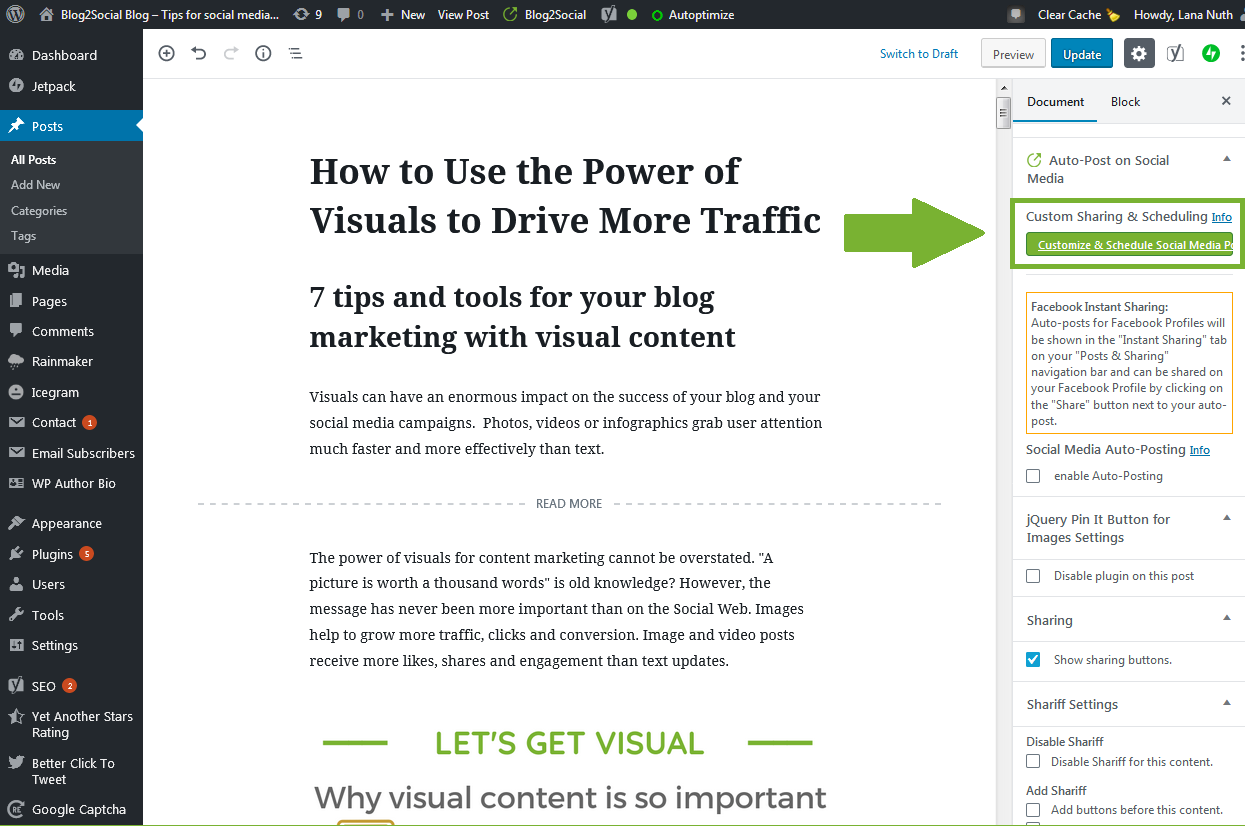
1. Directly from the blog post
When editing your blog posts, you will find a box saying "Automatically share on social media" in the right menu bar. Click on it to open it. Then click on "Customize & Schedule Social Media Posts" to get to the one-page editor.
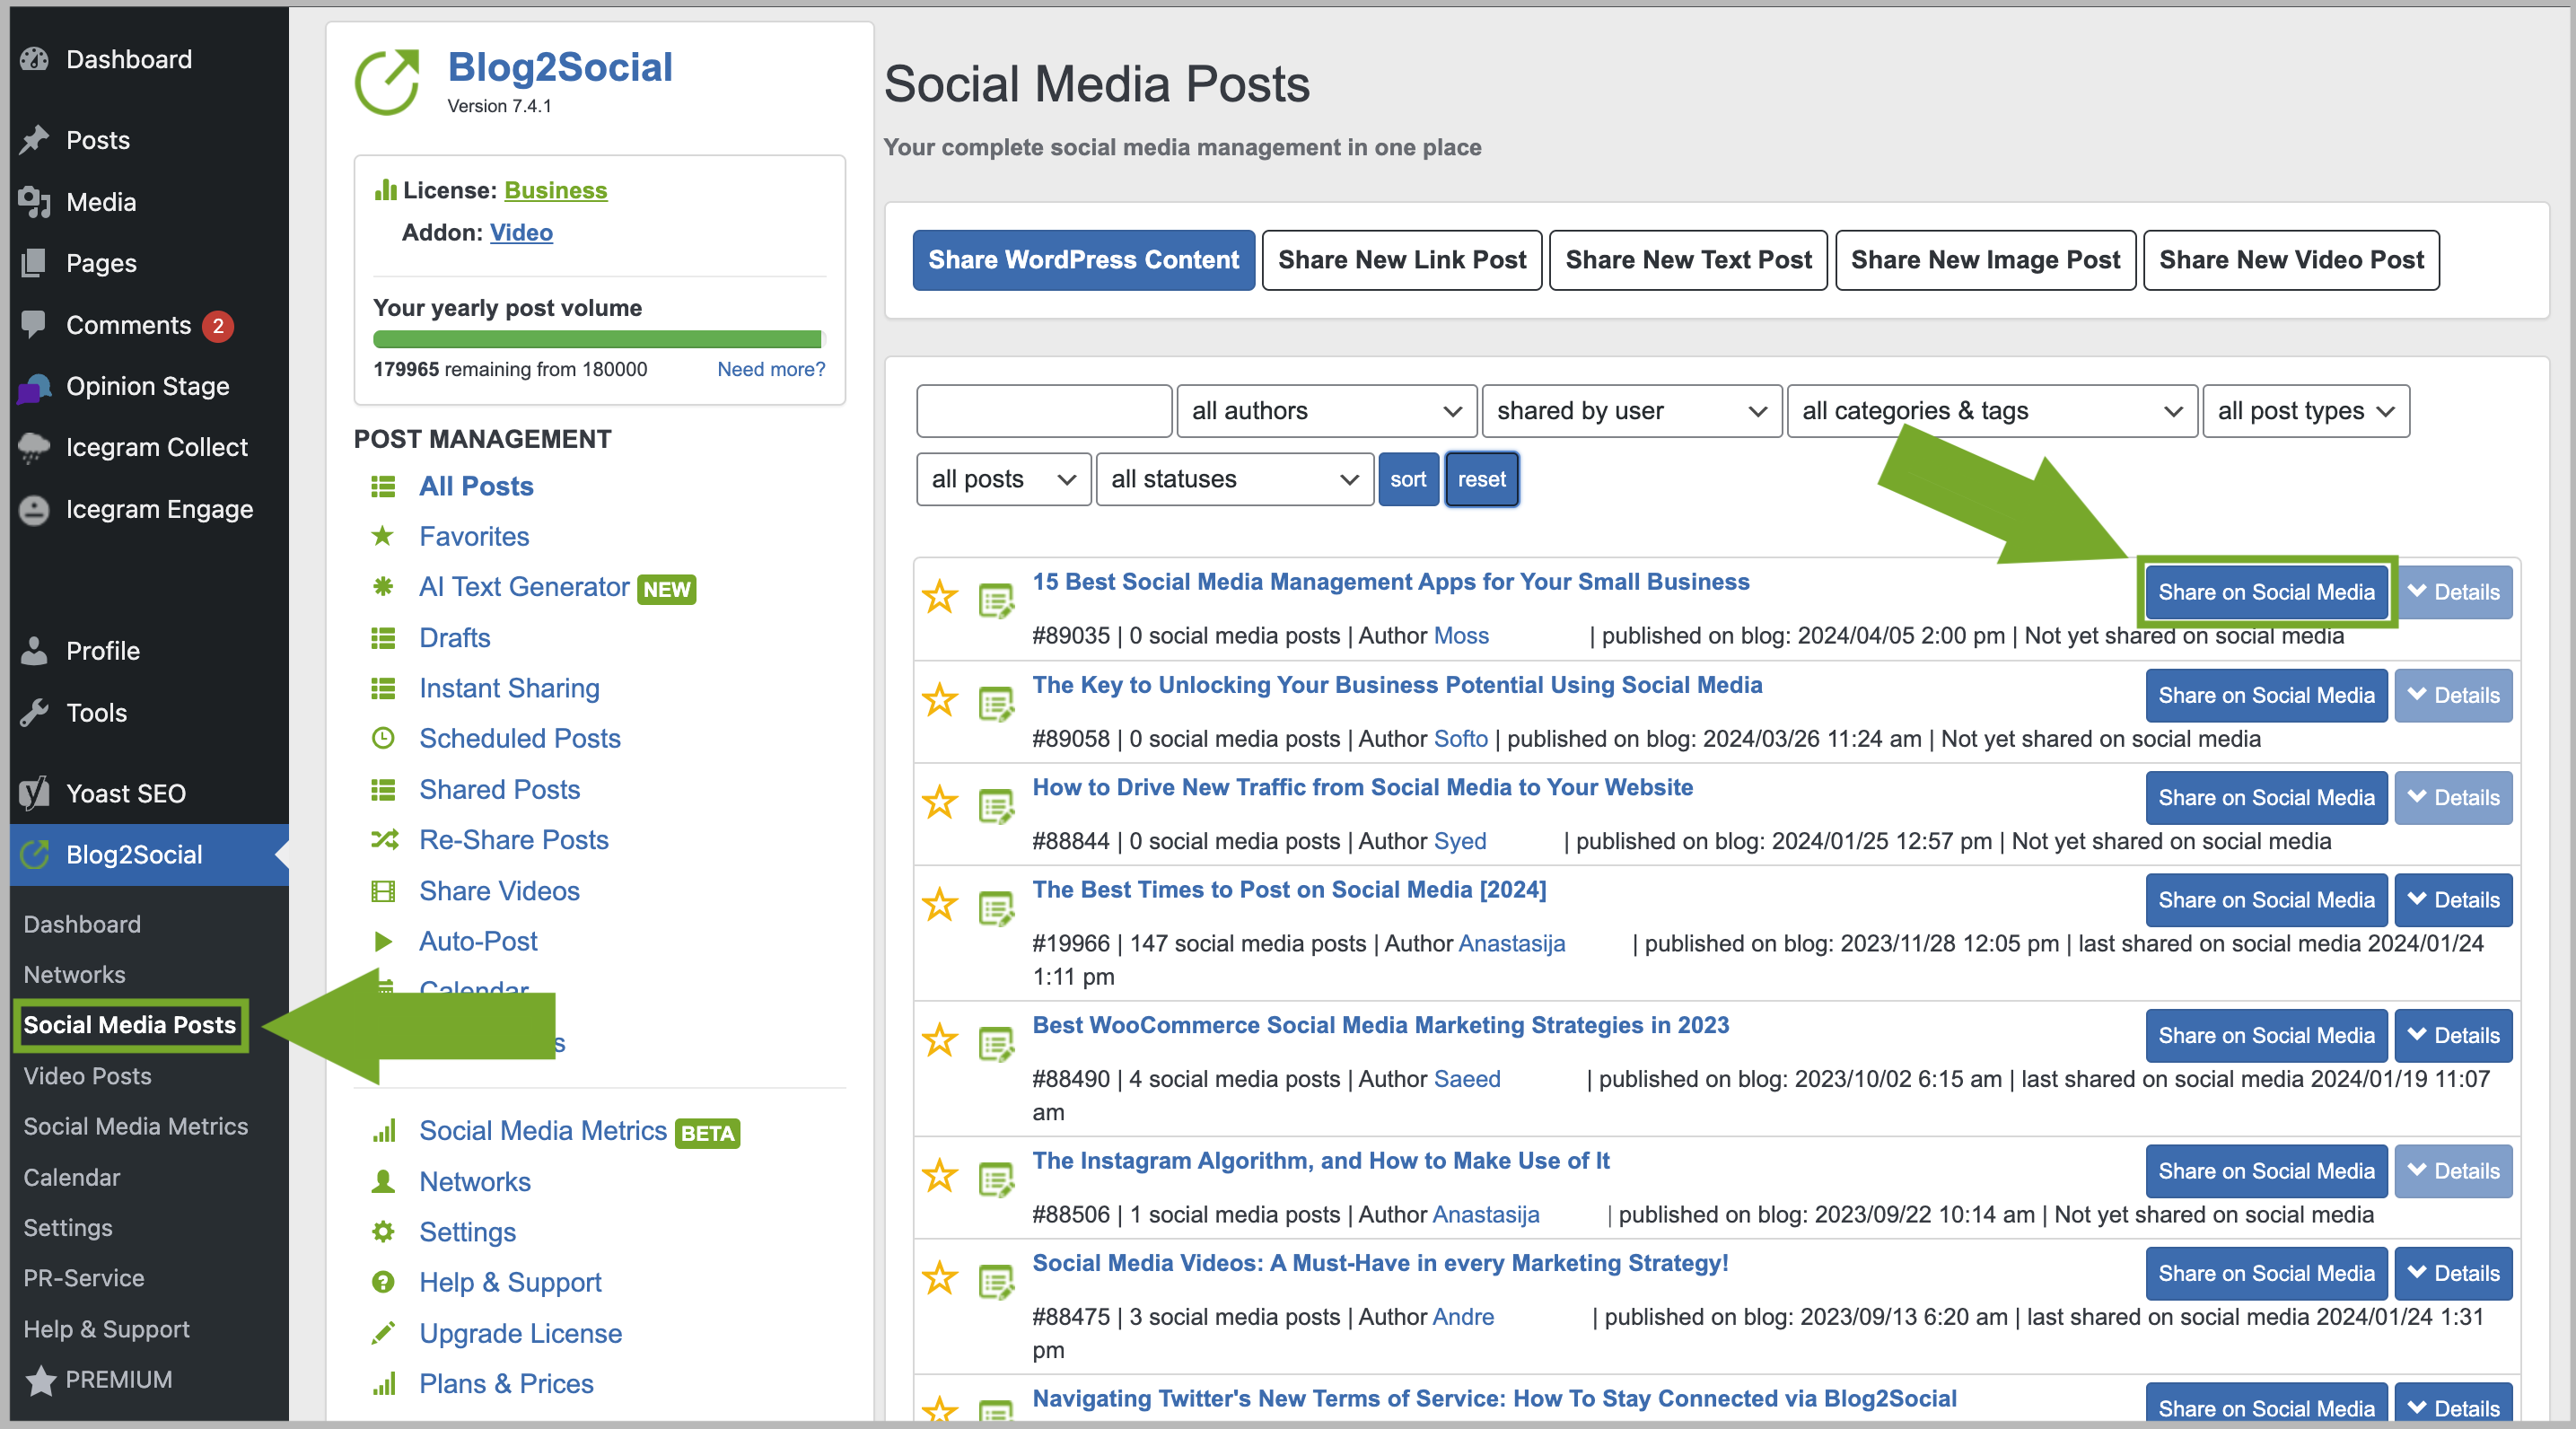
2. Or via the Blog2Social dashboard
First click on "Social Media Posts" in the Blog2Social menu in the navigation bar on the left, then select the blog post you want to share on social media by clicking on "Share on Social Media".
You will be forwarded to the Blog2Social one-page editor that shows you an overview of all your connected Social Media to which you can post now. Click on the accounts on the right sidebar to select or deselect them. Select the XING profiles or pages on which you want to share your blog post.
You can customize your social media posts for each XING connection by changing the image or comment text.
Then click "Share" to immediately share your post.
You can also schedule your social media posts for a specific date by selecting "Schedule for specific times" from the drop-down menu under your post. Blog2Social will then automatically publish your post at the selected time.
Especially with XING, we recommend that you individualize each post, as XING has very strict conditions for cross-posting.
#Tip: Every network has its own "best times". These are the times when most users are active on the network. Use these times to optimize reaching your target group.
On the business network XING, users are particularly active at the following times:
Weekdays: Tuesdays - Thursdays
Times: In the morning from 8 - 10 AM and shortly before the end of their workday from 5-6 PM
How to choose the best format for your XING profile posts
Using different social media post formats allows you to make the best of your social media post. You can now choose between image post and link post for profiles on the German business network XING. Your contacts see the posts in your XING profile on their start page and can like and comment on them.They are also visible to visitors of your XING profile in the "Activities". The regular publication of varied and useful content enhances your reputation.
The Image Post
The image post format sets the focus on your image. If you click on the image, the image will enlarge, making images with text easier to read. When using Blog2Social, your link is inserted as a clickable link below your text.Choose this format for posting important visuals and infographics. Posting informative visual content in this the image post format ensures that your readers can read all the information on your image without the need to leave XING.
The Link Post
A link post focuses on your link and your blog content. When using the link post format the social networks automatically generate a link preview from your Meta or Open Graph information. This preview usually consists of the post image (if available) and a teaser text. You can also add a personal comment text. Clicking on your image or link preview will take them directly to your blog post.Use the link post format to lead your readers to your blog, website or online shop by giving them a first impression of your content. If your post contains an image, XING also displays the featured image for your page. The image is automatically linked to your blog post.
Tags: How to connect XING, XING page, XING profile
Most popular FAQs
How to auto post imported RSS feeds
How do I auto-post and auto-schedule blog posts
Solutions: Why does Instagram not publish my post/text?
How do I connect Blog2Social with Instagram?
The connection to the server failed.
How to connect and automatically post to Facebook
I cannot connect my Facebook page
How to automatically re-publish blog posts on Bloglovin’
How to share on Facebook Profiles with Facebook