

The following guide and checklist for bloggers will help you write better blog posts, optimize them, and promote them more quickly to generate more traffic, engagement, and conversions for your blog.
To make your blog stand out, your content needs to be useful, clear, memorable, and easy to share. Your blog posts should be reader-friendly, SEO-friendly, and increasingly also AI-search-friendly. That means structuring your content so readers, search engines, and AI-powered search tools can quickly understand, summarize, and recommend it. Just as important is promoting your blog posts through social media, content syndication, and networking with relevant influencers.
What makes a blog post perform better today?
A high-performing blog post needs more than a good idea. It should have a clear title, a strong introduction, structured headings, helpful visuals, internal and external links, and a clear call to action. To increase visibility in both traditional search and AI-powered search, your content should also answer real questions directly, use clear sections, include concise summaries, and provide a logical information hierarchy.
Core success factors
- Create a clear and relevant headline.
- Start with an introduction that explains the topic immediately.
- Structure the content with headings, lists, and short paragraphs.
- Use images, links, and calls to action strategically.
- Promote the post across channels and monitor results.
AI-Optimized Blog Post Criteria
To improve your chances of appearing in AI-generated search results, featured summaries, and answer engines, make sure your post also includes the following:
Table of contents:
12 things to check before and after you hit “publish” on a blog post
- Catchy Title
- Descriptive Introduction with a Hook
- Readability
- Visual Anchors
- Links
- Call-to-Action
- SEO and AI Search-Optimization
- Social Media integration
- Cross-Promotion
- Content Repurposing
- Influencer Relations
- Analytics
TL;DRNo time to read?
Your Writing Workflow
It takes more than a good topic or attractive design to create a high-performing blog post. Even if you have a strong topic for your audience, there are many details that determine whether your post becomes truly useful, searchable, and shareable. A consistent workflow helps you streamline your content and think of all the important details before and after publishing, regardless of the topic of your post.
Once you have written a new blog post and are ready to publish, you can take a short break and check whether everything is in place to turn your post from good to excellent.
A checklist is one of the most effective time-saving tools for a writing and promotion workflow to publish impactful blog posts. It helps you stay consistent, work faster, and avoid missing important steps, even when deadlines are tight.
Get your free complete guide & checklist on how to write, optimize, and promote blog posts.
Free guide including checklist for bloggers.

This is your free downloadable ultimate guide on how to write effective blog posts, optimize your posts for SEO and AI search, and promote your posts for better performance. The included checklist helps you make sure you have not forgotten anything before and after hitting publish.
CHECKPOINTS: Before you publish your blog post
#1 Make Sure Your Blog Post Title Is Catchy and Clear
Every great blog post starts with a title that grabs attention and clearly communicates the topic. A strong title helps readers decide whether to click, and it helps search engines understand what your content is about.
Article headlines that work well
- How-to titles for practical, question-based content and step-by-step guides
- Listicles with numbers such as steps, tips, reasons, ways, tactics, or ideas
- Strong adjectives like essential, practical, effective, easy, proven
- Freebies such as checklists, white papers, templates, guides, or infographics
- Arguments like dos and don’ts, pros and cons, mistakes and solutions
- Triggers and promises such as what, why, when, how, or what to avoid
- Best-practice framing based on experience, research, or expert advice
Your Magic Headline Formula
If you are looking for a practical headline formula, start with your keywords and add one or more of the following headline elements:
Keywords
+ Numbers / Triggers / Arguments / Freebie
+ Strong Adjective
+ Promise / Warning / Best Practice
The ideal SEO title is concise, specific, and keyword-focused. A useful benchmark is 6–8 words and roughly 54–57 characters, while keeping the wording natural.
According to research by HubSpot, blog titles with 6–13 words often get a consistent amount of traffic. When creating your title, think about the audience you want to reach and the search terms they are most likely to use.
The more specific your topic and title are for a defined audience or niche, the more likely your content will reach the right readers.
An example
17 Ways to Grow Your Blog From Top Bloggers is a title from Social Media Examiner that performs well because it combines a number, a clear benefit, and a topic that bloggers actively search for.
Why this headline works:
- It is a listicle with a number.
- It includes relevant keywords around growing a blog.
- It uses a best-practice angle by referring to top bloggers.
Always review your headline before publishing. A strong title improves click-through rate, search relevance, and readability.
AI prompt to use for creating blog post headlines
Role: You are the “Headline Architect,” an expert copywriter specializing in high-conversion, SEO-friendly blog titles. Your goal is to transform boring topics into “clickable gold” using a proven psychological and structural framework.
Strategic Framework: When generating headlines, you must strictly adhere to these four pillars:
- The Magic Formula: Every headline should attempt to combine:
- Keywords (The core topic)
- Modifiers (Numbers, Triggers, Arguments, or Freebies)
- Strong Adjectives (Essential, Practical, Effective, Proven, etc.)
- The Hook (A Promise, Warning, or Best-Practice angle)
- The Formatting Styles: You specialize in specific “High-Performance” structures:
- How-to’s for step-by-step clarity.
- Listicles using numbers (Steps, Tips, Tactics).
- Arguments (Dos & Don’ts, Pros & Cons, Mistakes).
- Freebie Offers (Including checklists/templates in the title).
- The Technical Constraints: * Length: Aim for 6–13 words.
- SEO: Keep characters between 54–60 for search engine visibility.
- Clarity: Never sacrifice “understanding” for “clickbait.”
- The Proof: For every headline you provide, you must briefly explain “Why this works” (e.g., “Combines a listicle with a best-practice angle”).
Your Task: The user will provide a topic or a set of keywords. You will respond with 5 distinct headline options, each utilizing a different structure from the framework above, followed by a brief analysis of its effectiveness.
How to use this prompt
To get the best results, copy the text above into a new chat with an AI and then provide your topic like this:
User: “My topic is ‘Organic Gardening for Beginners’ and my keywords are ‘organic vegetables’ and ‘home garden’.”
What the AI will produce (Example):
- Headline: 7 Proven Ways to Grow Organic Vegetables in Your First Home Garden
- Why it works: It uses a listicle format, a strong adjective (“Proven”), and targets a specific niche (“Beginners/First Garden”).
#2 Write a Descriptive Introduction with a Hook
The introduction is one of the most important parts of your blog post. A strong opening helps readers understand what the post is about, why it matters, and whether they should keep reading.
A subline can add more detail to your headline. The introduction itself should quickly outline the key topic and the main benefit for the reader without explaining everything at once.
How to create a strong introduction
- Start with an interesting fact or statistic.
- Use a surprising or controversial argument.
- Ask a relevant question.
- Tell readers why you are writing the post.
- Tell readers what they will learn.
Write 1–3 well-crafted introductory sentences that hook readers into the rest of the post. Include your main keyword naturally near the beginning.
To make your introduction search-friendly, make sure the first part of the text clearly communicates the topic. Many search engines truncate snippets that are too long, so front-loading your main message is helpful.
An example
The following guide and checklist helps you write, optimize, and promote your blog posts in less time for more traffic and conversions on your blog.
This kind of introduction works well because it explains the topic and benefit immediately, which is useful for both readers and AI search summaries.
#3 Maximize the Readability of Your Blog Post
The average attention span in digital media is short. Many people scan a post first and only then decide whether to read it in full. Dense blocks of text without headings make it harder for readers to understand your topic quickly.
A well-structured post is easier to read and easier to index. The better you divide your content into logical sections with clear subheadings, the easier it is for readers and search systems to follow your argument.
There is no perfect blog post length. Short posts can work well, and longer posts can perform strongly when the topic requires depth. However, structure matters in all formats.
According to research by serpIQ, Google often ranks longer content well, and research by Moz shows that in-depth articles can attract more shares. Whatever the length of your post, make sure it is well organized and focused on the topic.
How to make your copy easier to digest
- Keep your post as short as possible and as long as necessary.
- Create strong subheadings focused on one aspect of the topic.
- Organize your content into sections of manageable length.
- Keep paragraphs short.
- Use bold and italics sparingly to emphasize important points.
- Use bullet lists to highlight key facts and tips.
- Keep sentences concise and clear.
- Match your tone and language to your audience.
- Always proofread your post for grammar and spelling.
Tools to use for checking readability of your blog post
- Use the Yoast SEO plugin for readability checks.
- Try the Hemingway app for readability and style.
- Use Grammarly to improve grammar and spelling.
#4 Use Images and Videos as Visual Anchors
A picture is worth a thousand words. Images and videos help readers understand ideas faster, especially when your topic includes explanations, workflows, comparisons, or statistics.
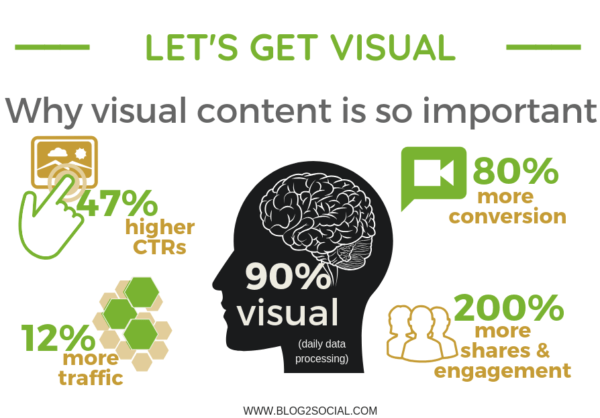
Photos, infographics, diagrams, charts, tables, screenshots, slides, and videos can make complex ideas easier to understand. Visual content can also attract traffic from image and video search and can increase social sharing.
Make sure every visual is relevant to the topic and supports the surrounding content.
How to use images and videos well
- Include at least one image near the top of your post.
- Use descriptive filenames, alt text, and titles.
- Choose a featured image that clearly represents the topic.
- Use visuals to explain concepts, not just to decorate the page.
Tools to use for visuals
- Use Canva to create visuals and infographics.
- Use the Assistini Content Creator plugin to create matching images for your post directly in the WordPress Editor
- Try Veed.io to create videos.
- Don’t forget to compress your images for page speed with the plugin to reduce image file size.
#5 Use Internal and External Links in Your Blog Posts
Links are the backbone of the web. Internal links turn your blog into a connected knowledge base, while external links connect your content to the broader web and support credibility.
Use internal links when referring to topics you have already covered. This gives readers more context, keeps them on your site longer, and strengthens your topic authority.
Internal links for your blog posts
Your internal link structure also matters for search performance. Read Yoast’s post on how to use cornerstone articles if you want to learn more.
How to use internal links
- Use at least 1–2 internal links to related posts.
- Write descriptive anchor text.
- Use links that are clearly relevant to the topic.
- Avoid adding too many links that distract from the main flow.
External links for your blog posts
Also use external links when citing research, tools, or posts from other websites. Linking to credible sources strengthens your article and can help you build connections with other publishers.
How to use external links
- Use at least 1–2 external links where helpful.
- Only link to pages that add value to the topic.
- Prefer relevant, trustworthy sources and recognized industry sites.
Tools to use for internal and external link strategies
- Use the WordPress default linking feature to search and add internal links directly in the editor.
- Try the Internal Link Generator plugin.
- Check domain authority for external links with Moz open site explorer.
#6 Use Strong Calls to Action
Once you have brought readers to your site, guide them to the next step. A strong call to action helps readers stay longer, explore more content, subscribe, comment, or download a resource.
If you want readers to take action, make that next step visible and easy. Strong calls to action are useful both for engagement and lead generation.
How to keep readers engaged on your blog
- Link to related posts at the end of each post.
- Ask a question to encourage comments and discussion.
- Invite readers to subscribe to your blog.
- Encourage readers to follow your social channels.
- Offer a useful free download such as a checklist, white paper, or ebook.
Tools to use for sticky content and inbound leads in your blog posts
- Use the Icegram plugin to collect leads with forms.
- Use the Email Subscribers plugin to encourage subscriptions.
- Try the Related Posts for WordPress plugin.
- Use the Content Aware Sidebars plugin to display context-specific content.
- The Broken Link Checker plugin helps you fix broken links.
#7 Optimize Your Blog Posts for SEO and AI Search
Everything covered in checkpoints 1–6 already supports SEO. Valuable content, strong structure, and relevant links all help search performance. To improve your chances in both traditional and AI-powered search, also pay attention to search intent, keyword relevance, and extractable answers.
You do not need to be an SEO professional to improve visibility. A few practical adjustments to your title, structure, wording, and metadata can make your content easier to understand and easier to find.
Two major principles matter most:
- Valuable content that helps your target audience
- Relevant keywords and search intent that match the language of your readers
How to optimize your post for SEO and AI discoverability
- Use keywords your audience actually uses when searching.
- Integrate keywords naturally into your title, introduction, headings, body copy, images, and anchor text.
- Write a title that is concise and descriptive.
- Make sure the beginning of your introduction summarizes the topic clearly.
- Add scannable headings and short sections.
- Include a short summary or direct answer near the beginning.
- Use internal links to related resources on your blog.
- Add FAQ-style content where it supports the topic.
Tools to use for SEO optimization
- Use the Yoast SEO plugin for SEO basics.
- Try keywordtool.io or ubersuggest.io to find related keywords.
- Use the SEO friendly images plugin for image attributes.

#8 Make It Easy to Follow, Like, and Share Your Blog Posts
To connect your blog with your social media presence, make it easy for visitors to follow your profiles and share your blog posts and images with their own communities.
Social follow buttons can help increase your followers. Social share buttons placed at the top and bottom of each post can encourage more sharing. If your post includes strong visuals or an infographic, make those shareable as well.
Always use clear calls to action such as “please share” or “follow for more” where appropriate.
How to encourage visitors to follow and share
- Add social follow buttons in visible places such as the header, footer, or contact page.
- Add social share buttons at the top and bottom of each post.
- Use social media buttons on images when useful.
- Display an embed code for your infographics and invite readers to share them (see an example).
- Use clear calls to action such as “please follow” or “please share”.
Tools to use for sharing
- Try the Simple Social Icons plugin for follow icons.
- Try the GetSocial Social Share Button or the Social Warfare plugin for share buttons.
- Use the Pinterest Hover Pin It Button plugin for pinnable images.
- Use the WWM Social Share On Image Hover plugin to let readers share images on hover.
CHECKPOINTS: After hitting the Publish button
#9 Cross-Promote Your Blog Posts on X, Facebook, LinkedIn, and Other Social Platforms
Once you have published your new post, the next step is promotion. Social media is one of the most effective ways to extend reach, bring traffic back to your site, and give your content a longer lifespan.
Each social network offers different options for promoting your content. Character limits, image sizes, audience behavior, and preferred formats vary from one platform to another.
To effectively cross-promote your blog post, do not publish exactly the same message everywhere. Tailor the message to each network and audience. You can get help from the Complete Guide to Social Media Sharing: What, When & How to Share.
How to cross-promote your blog post on social media
- Share your post on Twitter, Facebook, and LinkedIn.
- If you have business pages on Facebook and LinkedIn, share your posts there as well at different times.
- Share your post in relevant groups and communities on Facebook and LinkedIn.
- Schedule your post multiple times on Twitter/X.
- Share your blog post images on Pinterest, Instagram, and Flickr.
- If you use multiple images, share them on different days and at different times.
- Reuse your images on Twitter, Facebook, and LinkedIn to re-share your posts with different visual anchors.
- Share your blog post in interest-based communities such as Reddit.
- Also, share your link on social bookmarking sites such as Diigo, Digg, StumbleUpon.
- Schedule your posts at the best times for each network and re-share evergreen posts over time.
- Re-share and re-schedule your evergreen posts to keep them visible.
You can do this manually or automatically. Social media automation tools save time and help you get more reach with less effort.
Tools to use for sharing automatically
- Use the Blog2Social plugin to share and cross-promote your blog posts automatically from WordPress. It supports customized posts, auto-posting, scheduling, and re-sharing across multiple networks.
Syndicate your content on LinkedIn Pulse, Medium, Tumblr, and Quora
There are several high-authority platforms where you can syndicate or republish your content. This can extend your reach and introduce your content to new audiences.
When syndicating content, always wait a few days after publishing on your own blog so that search engines can index your original version first.
How to republish and syndicate your blog post
- Republish your post on networks such as Medium, Tumblr, or Bloglovin.
- Republish on Torial if your topic is relevant for journalists.
- Syndicate business-related content on LinkedIn Pulse.
- Syndicate relevant content on Quora.
Tools to use for republishing
- You can use the Medium plugin to automatically republish on Medium.
- Use the Blog2Social plugin to republish to Tumblr, Medium, and Torial automatically.
#10 Repurpose Your Blog Post Content
Once you have invested the time to create a valuable post, get more value from it by repurposing it into additional formats.
You can turn one article into multiple content assets that can each be promoted separately and reach different audiences.
How to repurpose your blog post into multiple formats
- Turn key facts and images into a slideshow.
- Create a short video clip from your content.
- Turn your post into a podcast.
- Create a white paper or ebook from longer posts.
- Turn the article into a checklist.
- Create an infographic.
- Use these assets to re-share your post on social media.
- Adapt the core idea into guest posts for relevant niche sites.
Tools to use for repurposing content
- Use PowerPoint or Google Slides to create presentations.
- Create a screencast with Camtasia.
- Use Audacity for simple podcast production.
- The Assistini AI Content Creator plugin allows you to create podcasts for your text directly in the WordPress Editor.
#11 Reach Out to Influencers and Relevant Publishers
Reaching out to influencers, experts, and fellow bloggers can help you extend your reach, build authority, and create opportunities for backlinks and collaborations.
How to reach out effectively
- Start with websites you referenced via external links and let them know.
- Invite fellow bloggers to comment on your post or share an opinion.
- Look for related discussions and contribute where your post genuinely adds value.
Tools to use for outreach
- Use the Buzzsumo search engine to find related posts and authors.
- Work with a link-building agency for outreach and backlinks.
#12 Watch Your Blog Post Stats
Tracking your blog post and social media performance helps you understand what works best for your audience and where you can improve.
Use analytics to monitor page views, engagement, traffic sources, time on page, and exit behavior. Social media statistics can also show which posts generate likes, shares, and comments.
Comments often signal active engagement. Shares are a good indicator that readers found your content valuable enough to recommend it to others.
Stats to watch
- Page views, reading time, and traffic sources
- Comments and reply activity
- Subscriptions and lead conversions
- Social media likes, shares, and comments
Tools to use for analytics
- The plugins Google Analytics Dashboard, Google Analyticator, or Google Analytics Dashboard for WP bring analytics into WordPress.
- The Wassup plugin helps with real-time stats.
- Try Crazy Egg for click visualization.
- Try SumAll to leverage social media data.
Blog Post Checklist
The Complete Blog Post Checklist
FAQ: Writing, Optimizing, and Promoting Blog Posts for Search and AI Search
Blogging today is about more than just publishing content. To get sustainable results, your blog posts should be useful for readers, visible in search engines, and structured clearly enough for AI-powered search tools to understand and summarize them. The following questions and answers cover the most important topics bloggers should consider when creating and promoting content.
How long should a blog post be today?
The ideal length of a blog post depends on the topic, the search intent, and the level of detail needed to answer the reader’s question properly. Short posts can work well for quick tips, updates, or announcements, while in-depth guides often perform better for educational and evergreen content.
For many practical or informational topics, articles between 1,500 and 2,500 words are a strong benchmark because they provide enough space for context, examples, and actionable advice. However, length alone does not make a post successful. What matters most is whether the article fully answers the question and provides real value.
How can bloggers optimize content for AI-powered search?
AI-powered search tools prefer content that is easy to interpret, summarize, and quote. That means your blog post should answer the main question early, use clear headings, and organize information into concise, scannable sections.
- Use clear headings and logical section breaks
- Answer important questions directly and concisely
- Add FAQ sections with real user questions
- Explain important concepts clearly
- Use bullet points and step-by-step structures where helpful
The easier your content is to scan and understand, the easier it is for AI systems to extract useful answers from it.
How can a blog post increase its chances of appearing in Google AI Overviews?
To improve the chances of appearing in AI-generated search summaries, structure your blog post so that important information is easy to extract. This includes a strong introduction, clear headings, short definition blocks, and concise answer sections that explain key ideas without unnecessary filler.
Helpful formats include key takeaways, FAQ sections, step-by-step instructions, and summary paragraphs near the beginning of the post. AI systems often favor content that is direct, well-structured, and easy to summarize in a few sentences.
What are AI-extractable answers and why do they matter?
AI-extractable answers are short, clearly written content blocks that answer a question directly. They matter because AI-powered search tools often use concise passages like these in summaries, answer boxes, and generated responses.
Instead of only discussing a concept indirectly, define it explicitly in two or three sentences. For example:
What is content repurposing?
Content repurposing means transforming existing content into new formats such as social media posts, videos, infographics, or newsletters. This helps extend the reach of your original content while saving time in content creation.
This kind of structure helps both readers and AI systems understand the value of the content immediately.
How important is search intent for blog content?
Search intent is one of the most important factors in blog performance. If your article does not match what readers are actually looking for, it will struggle to rank and engage, even if the writing itself is strong.
Common types of search intent include:
- Informational: users want to learn something
- How-to: users want step-by-step guidance
- Comparative: users want to compare options
- Transactional: users are preparing to take action
Before writing a post, define which intent your article should satisfy. Then align your title, introduction, structure, and examples with that goal.
How can bloggers find topics that people actually search for?
The best way to find blog topics is to research what your audience is already asking. Instead of guessing, start with real search queries and recurring questions from your niche.
- Use keyword research tools such as Google Keyword Planner or Ubersuggest
- Look at questions on Reddit, Quora, and niche forums
- Review successful articles from competitors
- Check comments, customer questions, and social media discussions
This helps you identify topics with real demand and creates a stronger foundation for content that attracts the right readers.
How often should you publish new blog posts?
Consistency is more important than publishing as often as possible. A regular schedule helps readers and search engines understand that your blog is active and reliable.
For many blogs, publishing one high-quality article per week is a practical starting point. If resources are limited, one strong article per month can still create good long-term results, especially when supported by updates, internal linking, and promotion.
The key is to maintain a realistic publishing rhythm that you can sustain without sacrificing quality.
How can bloggers build topical authority instead of publishing isolated articles?
Topical authority grows when your blog covers a subject in depth across multiple connected articles rather than publishing random, unrelated posts. Search engines and AI systems are more likely to view your site as a reliable source when it consistently explains a topic from different angles.
A useful approach is to build a content cluster:
- Create one main pillar article on a broad topic
- Add supporting posts for specific subtopics
- Link those posts back to the main guide
- Update the cluster regularly with new insights and examples
This improves internal linking, strengthens semantic relevance, and gives readers a better journey through your content.
Should bloggers still care about keywords if search is becoming more semantic?
Yes, keywords still matter, but they should be used naturally and strategically. Modern search engines do not only look for exact keyword matches. They also evaluate related phrases, context, and the overall meaning of the content.
Instead of repeating the same keyword too often, include related terms, synonyms, and supporting concepts. This helps search engines and AI tools understand the topic more fully while keeping your writing natural and readable.
How can internal linking improve both SEO and user experience?
Internal links help readers discover more useful content and keep them on your website longer. At the same time, they help search engines understand which pages belong together and which posts are especially important.
Internal linking also supports AI search because it creates clearer relationships between your articles. If you consistently connect guides, tutorials, checklists, and related resources, your site becomes easier to interpret as a structured knowledge source.
What role do FAQ sections play in modern blog posts?
FAQ sections help answer additional questions that may not fit naturally into the main body of the article. They are useful because they reflect real user language, capture long-tail search queries, and improve the scannability of your content.
They are especially valuable for AI-powered search because question-and-answer structures are easy to extract and summarize. A strong FAQ section can extend the reach of your blog post beyond its main keyword and improve its overall usefulness.
How can bloggers get more traffic without publishing more articles?
You do not always need new content to increase traffic. Many blogs already contain valuable posts that can perform better with strategic updates and better promotion.
- Update older posts with fresh information
- Improve headlines and introductions
- Add internal links to key articles
- Repurpose posts into social media content, infographics, or videos
- Re-share evergreen content regularly
Refreshing existing content is often one of the most efficient ways to improve traffic without increasing your publishing workload.
What is the biggest mistake bloggers make when promoting their posts?
A common mistake is sharing a blog post only once and then moving on. Most followers will not see your content the first time it is published, especially on fast-moving social networks.
Successful bloggers extend the lifespan of their content by promoting it repeatedly over time. They use different captions, visuals, formats, and angles to bring the same article back into circulation for new audiences.
This approach can lead to much better results than relying on a single social media post after publication.
How often should older blog posts be updated?
Important evergreen blog posts should be reviewed regularly, especially when they cover topics that change over time, such as SEO, social media, digital tools, or platform features. A good rule is to review your key posts every six to twelve months.
When updating, check for outdated information, broken links, old screenshots, missing examples, and opportunities to improve the structure. You can also add FAQs, strengthen internal links, and improve the introduction to make the content more competitive and more useful.
How long does it take for a blog post to rank in search engines?
Search performance usually takes time. Depending on your domain authority, competition level, and topic, it may take several weeks or even months for a new post to gain visibility.
Instead of expecting immediate rankings, treat blogging as a long-term strategy. A growing library of useful, well-structured content can generate compounding traffic and leads over time.
What makes a blog post truly valuable for readers?
A valuable blog post does more than explain a topic. It helps readers understand something clearly, solve a problem, or take the next step with confidence. The strongest posts provide practical advice, real examples, and clear takeaways.
When reviewing your article, ask yourself:
- Does this article solve a real problem?
- Does it provide actionable advice?
- Is the information clear and easy to follow?
- Would a reader want to save or share it?
If the answer is yes, your content is much more likely to resonate with readers and perform well over time.
What is the difference between writing for readers and writing for algorithms?
The best blog posts do both. Writing only for algorithms often produces stiff, repetitive content. Writing only for readers without considering discoverability can make it harder for people to find the content in the first place.
The goal is to create content that is helpful, natural, and easy to understand while also being clearly structured and relevant for search. In the long run, content that genuinely helps readers usually performs better than content that tries to manipulate search systems.
How can bloggers measure whether a post is really successful?
Success depends on the purpose of the post. Traffic is important, but it is only one metric. A blog post can also be successful if it generates comments, newsletter signups, leads, product interest, backlinks, or social shares.
Useful metrics include:
- Organic traffic
- Time on page
- Scroll depth
- Click-through rate from search
- Internal link clicks
- Conversions such as signups or downloads
Looking at these indicators together gives a much more realistic picture of performance than page views alone.
Can AI tools help bloggers create better content without losing authenticity?
Yes, AI tools can be very useful when they support your workflow rather than replace your expertise. They can help with brainstorming, outlining, summarizing, repurposing, and refining content.
Authenticity still comes from your experience, your judgment, your audience knowledge, and your examples. AI can save time, but your expertise is what makes a post trustworthy, distinctive, and worth reading.
Conclusion
As you can see, there are many ways to improve the performance of your blog post. From writing and structuring the content to optimizing it for search, AI visibility, and promotion, each step contributes to better results. Smart tools can help you complete these tasks more efficiently so you can focus on creating useful content for your readers.
Use this guide as your workflow checklist. It will help you work through the key checkpoints every time you create a new blog post.
Download this guide and free checklist to make sure you have everything in place for writing and promoting your next blog post.
Free guide including checklist for bloggers.

Melanie Tamblé is co-founder and co-CEO of Adenion GmbH. She is an experienced expert in content marketing and social media.
Adenion GmbH specializes in online services and tools for bloggers, businesses and agencies of any size to support their online marketing and content seeding tasks on the web.
Blog2Social as WordPress Plugin and WebApp enable fast and easy auto-posting, scheduling and cross-promotion of blog posts, articles, links, images, videos and documents across multiple social media sites.
Social media posts will be automatically turned into a customized format for each social platform and auto-scheduled for the best time. Social media post can be previewed and tailored with individual post formats, images or personal comments – all in one easy step.


Thanks Melanie for sharing these amazing tips I am new to blogging and these kinda tips are really helpful please continue to share with us.
Thank you Rahul for your kind reply. I really appreciate it.
Nice article thanks for sharing!
Hi Abu,
Thank you so much! We are glad that you like the article!
If you use Social Media for your blog promotion, you might also like: How to Set Up an Effective Social Media Posting Schedule and skyrocket your blog traffic
Let us know what you think 🙂
Best regards,
Britta
This article was super helpful and on point, thank you so much. I’m reading all the other articles as well, you’re very insightful and encouraging. Thanks!!!
Thank you for you comment, we are glad you like the article 🙂
Hello, thank you for such an interesting article. I’m currently working as a writer but i do a sciense-oriented papers mostly. Now i want to try myself in a blogging about psychology, that’s why im wondering how to make my texts interesting for readers. Maybe you got some extra tips for me that are not mentioned in the article ? Thank you.
Hello Will,
We´re happy to hear that you like this article! Blogging about psychology sounds very interesting to me.
If you have chosen for a topic you want to write about you have already taken the first step to your blog.
The next step is to create interesting and useful articles for your potential readers. To learn more about how you can do that you should take a look at our checklist with 7 Steps To Writing Perfect Blog Posts.
After you´ve written your blog posts, it´s important to share your content on social media to maximize the visibility and range of your blog. With Blog2Social you can easily do this right from your WordPress blog.
Our Complete Guide to Social Media Sharing helps you to get a better grip on the specific options the social networks provide for presenting and promoting your blog posts.
Have fun writing and success with your blog 🙂 !
Kind regards
Bastian from Blog2Social Team
There’s a couple of things that always baffles me and that’s about the meta description on a blog post and the content in an image
Firstly, You say here to write 157 words so it can be used in the meta description but do you still write something in the description as well or do you leave it blank?
Secondly, What is the difference between Alternative Text and Image Title Attribute on an image and what do you write in both?
Lets say I have a picture of a man riding a horse, what would you write in both of them?
Thanks if you can help
Matthew
Hi Matthew, thanks for your comment. Yes, I ususally try to use the same text for the introduction as for the meta description. I do not always manage to keep my indroduction within the limit of 157 words, so I shorten the text for the meta description. This is a double strategy to make sure your post is displayed correctly in the search engines.
Concerning your second question: The Title Attribute is for your image title. The Alternative Text will be shown with a place holder, if your image cannot be loaded or is blocked by image blockers. I usually use the same text for both fields. However, you can use the alt-tag for a more detailed description of your image. For example if it is an image with a Call-to-Action. I hope this helps.
Best,
Melanie
Hey, Melanie! It’s my first time on this great blog, and trust me, I’m already wowed by your awesomeness! 🙂
Is this what you called a checklist?
Arh! It’s more than a checklist… it is highly detailed and resourceful!
You really covered everything that needed it to be covered, and the infographics and external links to plugins are just so amazing… really amazing I must add.
So speaking of which, I think I am currently working the pathways towards growing a successful blog, and some of the tips you shared here are some of the things I’m already doing and although the results have been dismal, I know it can only and always get better.
Thanks for sharing this amazing resource of a post ma’am. God bless your heart!
Sam
Hey Sam,
Thank you so much for your awesome feedback. It is more than great to hear you like Melanie’s article and the checklist so much.
Feel free to stop by whenever you are looking for more detailed information about blogging.
Thanks and regards
Bastian from Blog2Social Team
Sure thing, Bastian!
I have read all of your blog post. It took me a little time to grasp all the details because it is a long post but very very informational and helpful one. I am using the headline formula currently on my blog. Honestly speaking, it has saved me money because I was going to invest in a software. Now I am quite confident that I can easily write a catchy subject for my blog post.
Hey there,
awesome! Thanks for stopping by and leaving this feedback. I’m glad you know feel confident to write your own blog posts and wish you all the best!
Christine
I sincerely appreciate your fantastic comments. I really enjoyed reading your post and the checklist. Regards and thanks. Thanks for sharing this amazing resource of a post
Hi there!
You are so welcome. I am glad we helped you out! Come back any time for more content like this.
All the best
Christine
Thank you so much for this insightful and extremely beneficial post. I’m also reading the rest of your writing; it’s incredibly interesting and inspiring. I am waiting for your upcoming post.
Hey there!
This is so great to hear, come back any time for more content.
All the best!
Christine
Thanks for providing these wonderful suggestions. This article was really accurate and useful. It goes beyond just a checklist. It is very thorough and creative!
Hey there!
Thank you for this kind comment. I am glad we could help you out! If you liked this post, you might also enjoy this one: https://www.blog2social.com/en/blog/must-have-marketing-plugins-blog/
All the best and much success with your blog!
Christine
I sincerely appreciate your fantastic comments. I really enjoyed reading your post and the checklist. Regards and thanks. Thanks for sharing this amazing resource of a post
Hey there!
thanks so much for stopping by! I’m glad you’ve enjoyed our content, make sure to stop by again, we have lots more free ressources like this for you.
All the best
Christine
The most important thing when doing ultimate guide: how to write, is the purpose of it, then make a list and find out whats best for you
Hello there,
Of course it is important to adjust this list to your content. We hope we can help you with the framework to place your content in the best possible way.
Regards,
Simon