How to connect my blog to VK for auto posting?
As one of the leading social networks worldwide, with over 410 million registered users and over 710 million hits per day, VK.com attracts a massive amount of traffic every single day.
Especially in Russia and other Post-Soviet states like Ukraine, Belarus and Kazakhstan, VK.com is by far the most popular social network. When targeting an audience in these eastern European countries, VK.com is THE network to use. Auto posting your blog posts to VK can help you find new readers, skyrocket your engagement rate and gain more traffic for your blog.
Similar to Facebook, VK allows you to share your content on your profiles, pages and in groups. Sharing your blog posts automatically can save you time that you can use to engage with your followers. Learn how to share your blog posts on VK, including images and links to your blog, to get more outreach and visibility.
Why you should connect your blog to VK
Even the most interesting blog posts won’t be read if your target readers can’t find them. Readers usually won’t find your blog by pure magic. You have to actively bring your content on platforms where your readers already are: Social media networks are a great source to find new readers.
To reach potential clients, readers and followers in East Europe and Russia, VK is an absolute must. Cross posting your articles on various social media will expand your reach and help you drive more traffic to your blog. People are also more likely to engage with your blog posts on social media than they are on your blog. They are already logged in, so it’s easier for them to just click “comment” and engage with you and your content.
Especially, if you run a business, promoting your brand, products and blog contents on your VK fan or business page or a VK group can help you reach many new readers and potential customers and lure them to your blog or website. Additionally, VK profiles can be a great asset to brands by adding a friendly face and giving their posts a personal touch.
How to auto post on VK
VK gives you a lot of options for your posts. Text posts work as well as image, audio and video posts. While there is no limit to the character count of a comment, make sure to keep your post within 1200 characters, if you want people to see your whole post. Every post that exceeds 1200 characters will be shortened to about 325 characters and the rest will be hidden behind the “Expand text” button.
To trigger likes, shares and comments and to boost your reach
- Post visuals: images, videos, links
- Keep comments short: less than 50 characters
- Link to longer form articles over 1,000 words
- Write personal comments and give reasons for reading, liking and / or sharing your content
- Ask questions to get response: What, Why, Who, When, How
- Promote your blog post once for initial promotion
- Auto Post to VK once or twice a day, not more
- Share your content on profiles, pages and in groups at different times
Among all post formats, photo and link posts are by far the most successful when it comes to generating organic reach.

When auto posting a photo post to VK, your followers, fans or friends will be able to view the image, info graphic or photo in a preview on their news feed. By adding a link to your blog post in the comment they will also be able to visit your website. The main advantage of this post format is that users will permanently be able to view the shared image and visit your blog post, as the photo will be saved in your VK albums.
However, manually sharing your blog posts across all your VK channels can be quite time-consuming. No matter, if you are a freelance blogger or managing a company’s website, it simply feels like there’s never enough time for this tedious work.
Why should you tailor your posts when auto-posting to VK pages and profiles?
Especially when auto-posting to business pages it is important to do it right! Posting the exact same comment and images on profiles, pages and in groups will eventually bore your followers and drive potential customers away. Each audience is different. Consider your tone of language when addressing your page audience and try to keep your posts personal and engaging.
Therefore, when connecting your blog to VK, make sure to apply a plugin which enables you to customize your postings and tailor them to your specific page or profile audience.
How to connect VK to your Wordpress blog?
With Blog2Social you can auto post to all your VK channels directly from your WordPress editor and set up your entire VK promotion on profiles, pages and in public groups within a couple of clicks.
To connect your blog with your VK profile with Blog2Social, please go to "networks" within your Blog2Social Dashboard. Here you find an overview of all your social media profiles, pages and groups you’ve connected so far. To add a VK profile, page or group simply click on the respective button.

A separate window will open and ask for your login data. Please authorize the connection to your VK profile by entering:
- Your Phone or email
- Your password
- Confirm everything by clicking on "Log in".
In case you are managing more than one page, use the drop down menu to select which page you’d like to connect to your blog. The same goes for groups. To connect a group, simply open the drop-down menu after entering your profiles username and password and select the group you’d like to post to. Afterwards, click on “authorize” and you will immediately be able to share your contents with fellow group members.
Tip 1: You can speed up the authorization by logging into your VK account in a separate tab of your browser. This way, Blog2Social will automatically connect and authorize your page, profile or group as soon as you click on "+page", "+ profile" or “+group”.
Tip 2: Every VK groups has its own specific set of rules. Please make sure to read those rules carefully before posting in VK groups to prevent being blocked from any group.
You can optimize your postings to profiles, pages and groups by adding individual comments and images and schedule your postings at different times. This is especially important when sending out the same content to all your VK channels.
How are photo posts shared to VK profiles, pages and groups?
All images shared as photo post will be uploaded and linked to your VK photo album and will be available permanently for your followers to see and follow the link to your blog post. Blog2Social automatically adds the link to your blog post in the comment, to lead your readers to your blog. You can select short links or clear links in your Blog2Social settings.
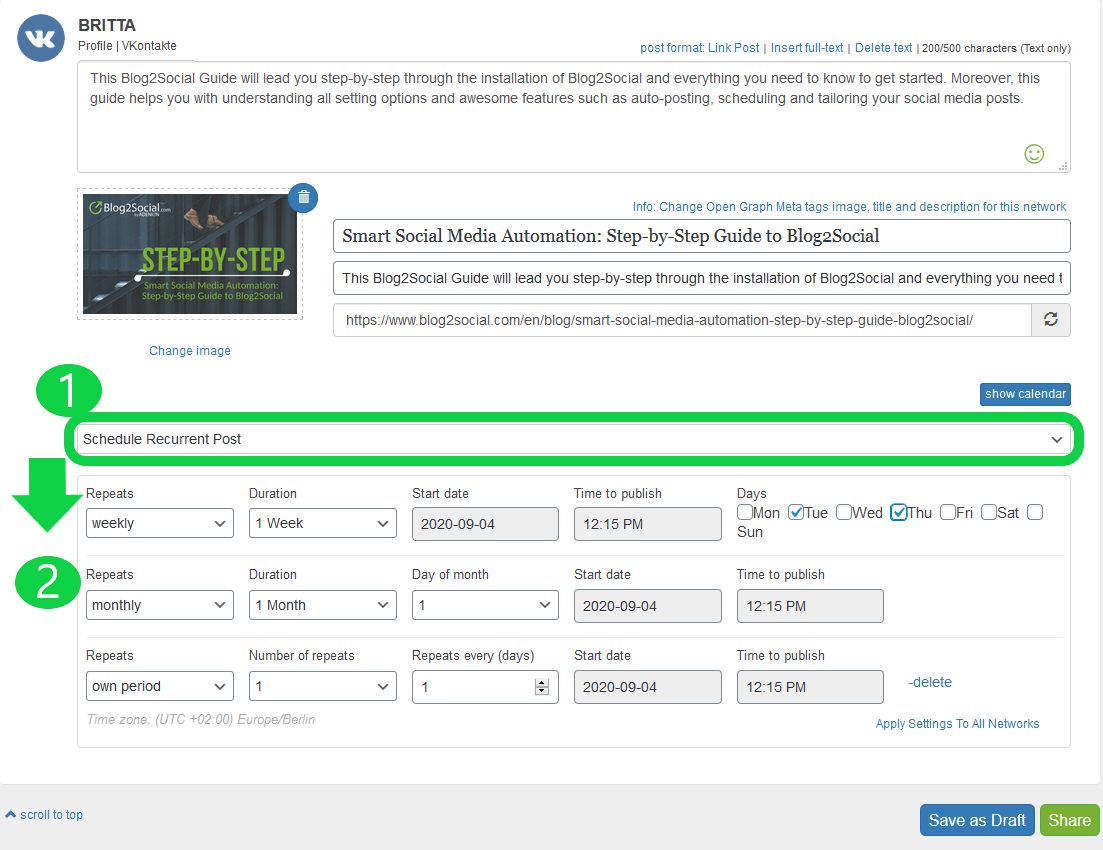
How to set up a recurring scheduling scheme for your posts on VK profiles, pages and groups?
To save even more time for your VK cross-promotion you can schedule your VK postings on profiles, pages and in groups or even set up a recurring scheduling scheme for evergreen content.
To do so
- Open up the drop-down menu below the post preview and select to share your post immediately, to schedule it once or to set up a recurring scheduling scheme
- Choose between weekly, monthly or your own period of repeats
For scheduling your posts on your VK profiles, pages and groups you can pre-define your own preferred time settings for all your posts or for specific social media accounts or you can simply apply the Blog2Social Best Time Manager. You will find both scheduling options at the top of the preview page. By scheduling your social media posts for your specific times your blog post will always be shared at the best times for each network to reach a maximum of your followers.
If you click "Share" your customized posts will be shared at your scheduled times, while you can commit to more important things.
You might also be interested in:
- How to Connect Your WordPress Blog to Facebook for Auto-Posting
- How to Boost the Organic Reach of Your Facebook Posts with Smart Social Media Automation
- A Complete Guide To Social Media Sharing: What, When & How To Share
Tags: VK
Most popular FAQs
How to auto post imported RSS feeds
How do I auto-post and auto-schedule blog posts
Solutions: Why does Instagram not publish my post/text?
How do I connect Blog2Social with Instagram?
The connection to the server failed.
How to connect and automatically post to Facebook
I cannot connect my Facebook page
How to automatically re-publish blog posts on Bloglovin’
How to share on Facebook Profiles with Facebook